Your own senses are often the best first line of defense against a hidden mold problem. Long before you need special equipment, a quick walk through your home—paying close attention to what you smell and see—can give you a huge head start. In my experience, most homeowners first realize something is wrong not because they see big black spots, but because of a persistent, musty smell that just won't go away.
That gut feeling is usually right.
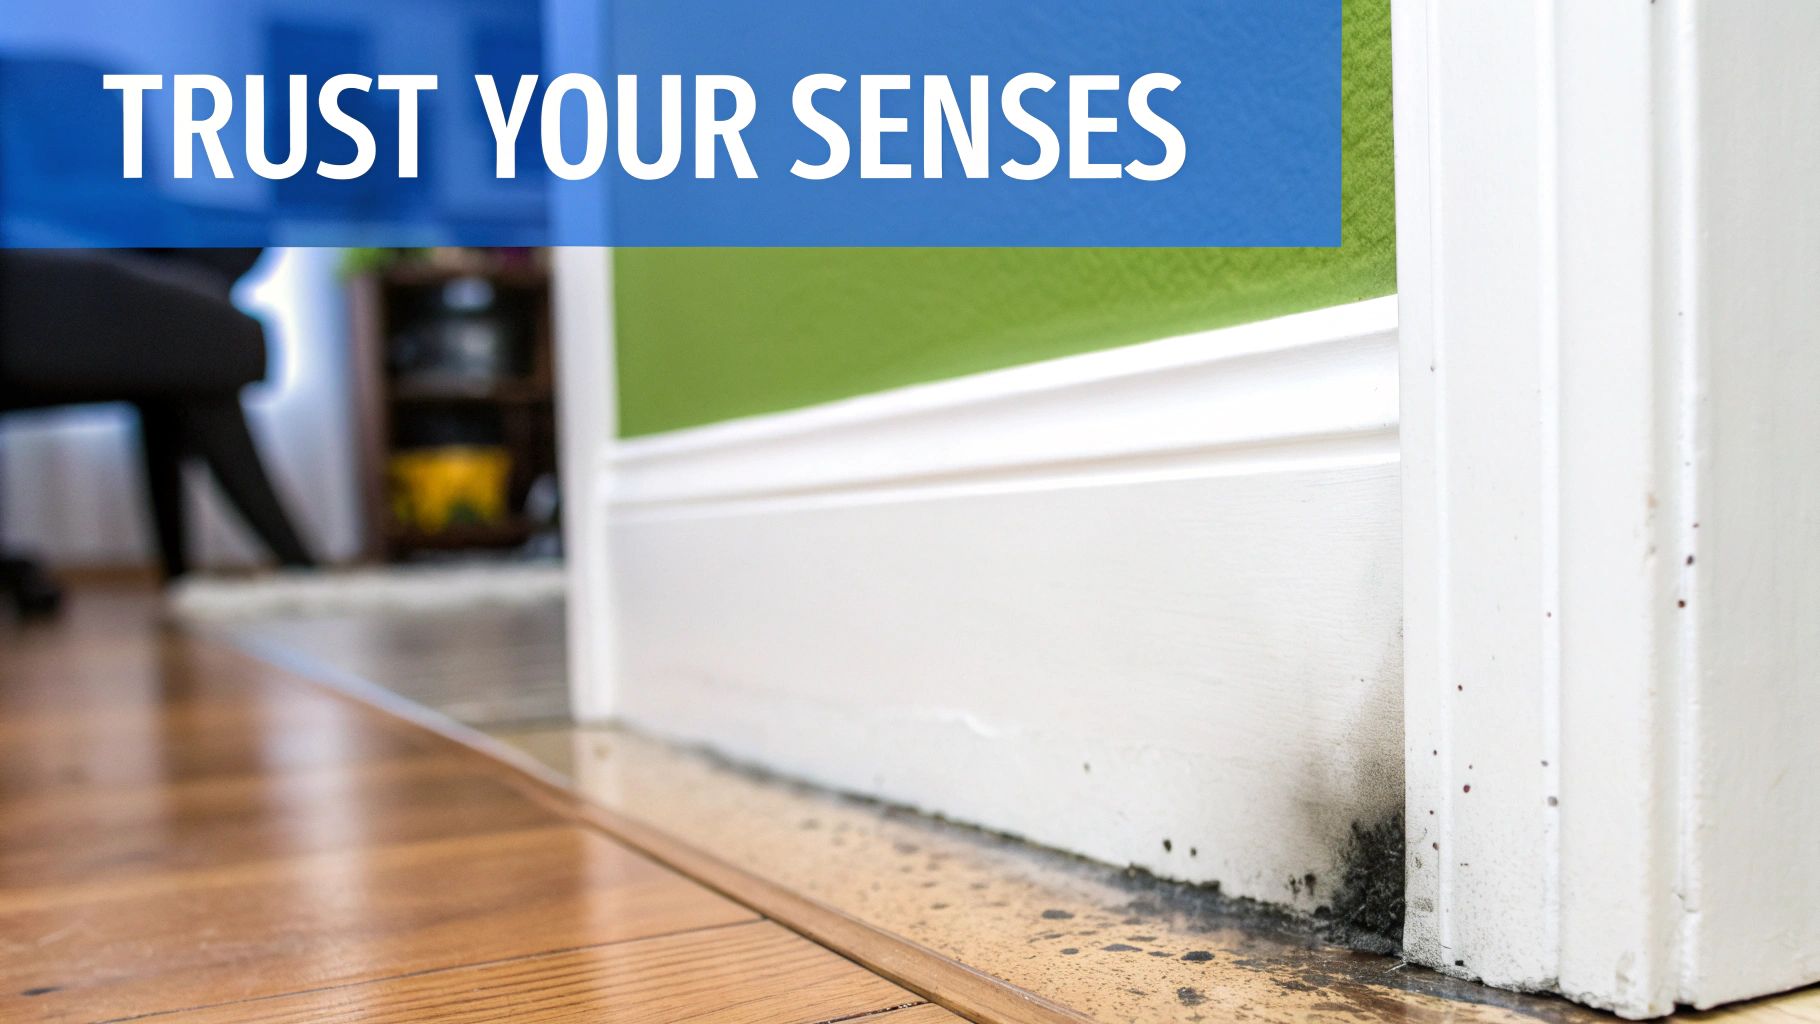
That distinct “old, damp basement” odor comes from Microbial Volatile Organic Compounds (MVOCs), which are gases that mold releases as it eats and grows. If that smell hits you when you open a closet or when the AC kicks on, that’s a major red flag. It’s a strong sign that mold is growing somewhere nearby, even if it’s tucked away behind a wall or under the carpet.
We have a whole guide on how to know if that musty smell is mold that can help you decipher what your nose is trying to tell you.
Quick Guide to Common Mold Indicators
To help you get started, here's a quick rundown of the most common signs, what they typically mean, and what to do first.
| Indicator | What It Means | Recommended First Action |
|---|---|---|
| Persistent Musty Odor | Active mold is likely growing somewhere, releasing MVOC gases. This is often the first and most reliable sign. | Follow the smell to its strongest point. Check for hidden moisture sources in that area (e.g., behind appliances, under sinks). |
| Visible Discoloration | Mold is present and growing on a surface. It can be black, green, white, or even orange. | Do not disturb it. Take a clear photo for documentation and then call a professional for an assessment. |
| Peeling or Bubbling Paint | Moisture is trapped behind the paint, creating the perfect environment for mold to grow underneath. | Check for leaks from pipes, roofs, or windows in the immediate vicinity. Measure moisture levels if you have a meter. |
| Water Stains | An past or current water intrusion event has occurred, which is the primary cause of mold growth. | Confirm the source of the water is fixed. Inspect the stained area and surrounding materials for any signs of mold growth. |
| Warped Walls or Flooring | Significant moisture has saturated the building materials, likely leading to hidden mold within the structure. | This often indicates a serious, long-term leak. A professional inspection is highly recommended. |
Remember, these signs are your home’s way of telling you that something is wrong. Acting on them quickly can make all the difference.
Learning to Spot What Isn't Just Dirt
Visually, mold can be a real chameleon. It doesn't always show up as the stereotypical fuzzy black circles we see in pictures. Be on the lookout for more subtle signs:
- Faint Stains: Keep an eye out for gray, white, or yellowish patches that look a lot like old water stains.
- Odd Textures: In places with constant moisture, like shower corners or under a leaky pipe, mold can look velvety or even slimy.
- Speckles on Fabric: Check curtains, rugs, or upholstery near damp windows for tiny black or green dots.
Here’s a pro tip: Unlike dirt, mold tends to grow in circular patches. If you wipe it away and it comes right back, you’re almost certainly dealing with mold, and you haven't solved the moisture problem feeding it.
The most reliable sensory clue is a musty odor that has no other identifiable source. If your home smells damp and earthy even when it’s dry, you are likely smelling active mold growth. Trusting this early warning sign is the key to preventing a small issue from becoming a major remediation project.
The health and property risks associated with mold are becoming more widely understood. The global mould detection service market was valued at around $490.2 million in 2025 and is projected to keep climbing. North America alone accounts for about 39.0% of that revenue, which shows just how seriously homeowners are starting to take early detection.
Your Room-by-Room Mold Inspection Checklist

Finding mold isn't about luck; it's about being methodical. You need to think like water, tracing its potential paths through your home. This room-by-room guide will help you systematically check the most common hotspots, turning a big, overwhelming task into a manageable investigation.
Grab a good flashlight—seriously, your phone's light won't cut it—and let’s start where moisture causes the most trouble.
High-Moisture Zones: Bathrooms and Kitchens
Bathrooms and kitchens are ground zero for mold. With constant water use and steam, even a tiny, slow leak can create the perfect damp environment for mold to take hold.
Start your inspection under the sinks. Get down there and really look at the P-trap, the supply lines, and the cabinet floor. Are there any water stains, drips, or that distinct musty smell? Check the caulk around the sink and faucet base. If it's cracked or pulling away, that’s an open invitation for water to seep into the wall.
In the bathroom, your focus should be on:
- Showers and Tubs: Look closely at the tile grout and caulk lines. Any black or even pinkish discoloration is a red flag for mold or mildew. Don’t forget to look up—peeling paint or dark spots on the ceiling above the shower are classic signs of steam condensation.
- Around the Toilet: Inspect the base of the toilet for any hint of a leak. Water damage here can quietly rot the subfloor, leading to a serious hidden mold problem.
- Exhaust Fans: Is the fan actually working? A dusty, clogged, or dead fan isn't removing humid air, which is a major reason mold gets started in bathrooms.
In the kitchen, the refrigerator is a prime suspect. If you can, pull it out and check the wall behind it and the floor underneath. The water line for the ice maker is notorious for slow leaks that can go unnoticed for years.
Don’t just look for obvious black splotches. Pay attention to the subtle clues: paint that's bubbling, wallpaper lifting at the seams, or baseboards that look slightly warped. These are often the first signs that moisture is trapped right behind the surface.
Living Areas and Bedrooms
While not as constantly damp as kitchens or bathrooms, living areas and bedrooms have their own weak spots. Windows are a huge one, especially in coastal climates like Santa Barbara where morning condensation is a daily reality.
Check the window frames, sills, and the drywall right below them. See any moisture between the panes of a double-pane window? That means the seal has failed, creating a perfect little terrarium for mold. Any dark, peppery spots on the drywall around the frame are a dead giveaway that water is getting in.
Another critical spot is your HVAC system. Pop off the vent covers for the supply and return air ducts and shine your flashlight inside. If you see any visible growth or get a whiff of that musty smell, you’ve got a problem. A contaminated HVAC system will happily spread mold spores throughout your entire home every single time it kicks on. Spotting these issues helps you understand the bigger picture of the signs of mold in a house.
Unseen Spaces: Attics and Crawl Spaces
The parts of your home you rarely enter are often where the biggest mold problems are hiding out. Attics and crawl spaces are prime real estate for mold because leaks and poor ventilation can go undetected for months or even years.
Attic Inspection Checklist
- Look for Stains: Scan the underside of the roof sheathing. Pay special attention to dark water stains around vents, chimneys, and where different rooflines meet.
- Check Insulation: Is the insulation compressed, damp, or discolored? That’s a clear sign of a roof leak.
- Inspect Ventilation: Make sure soffit vents aren't blocked by insulation and that attic vents are clear. If hot, moist air gets trapped up there, it will lead to condensation and mold.
- Examine Bathroom Vents: This is a big one. Confirm that bathroom exhaust fans are ducted to vent directly outside, not just into the attic space. Venting humid air into the attic is a guaranteed recipe for a major mold problem.
Crawl Space Inspection Checklist
- Assess for Dampness: Note any standing water, soggy soil, or that unmistakable musty smell. A proper crawl space should have a thick plastic vapor barrier covering the ground.
- Inspect Joists and Subfloor: Shine your flashlight along the wooden floor joists and the underside of the subfloor above. Look for any fuzzy, stringy, or discolored growth.
- Check for Leaks: Look for dripping pipes or signs of water seeping in through the foundation walls.
These hidden areas are absolutely critical. A small leak in the attic or chronic dampness in the crawl space can compromise your home's structure and air quality without you ever knowing. This systematic check is essential to knowing how to detect mold before it becomes a crisis.
Using Simple Tools to Uncover Hidden Moisture
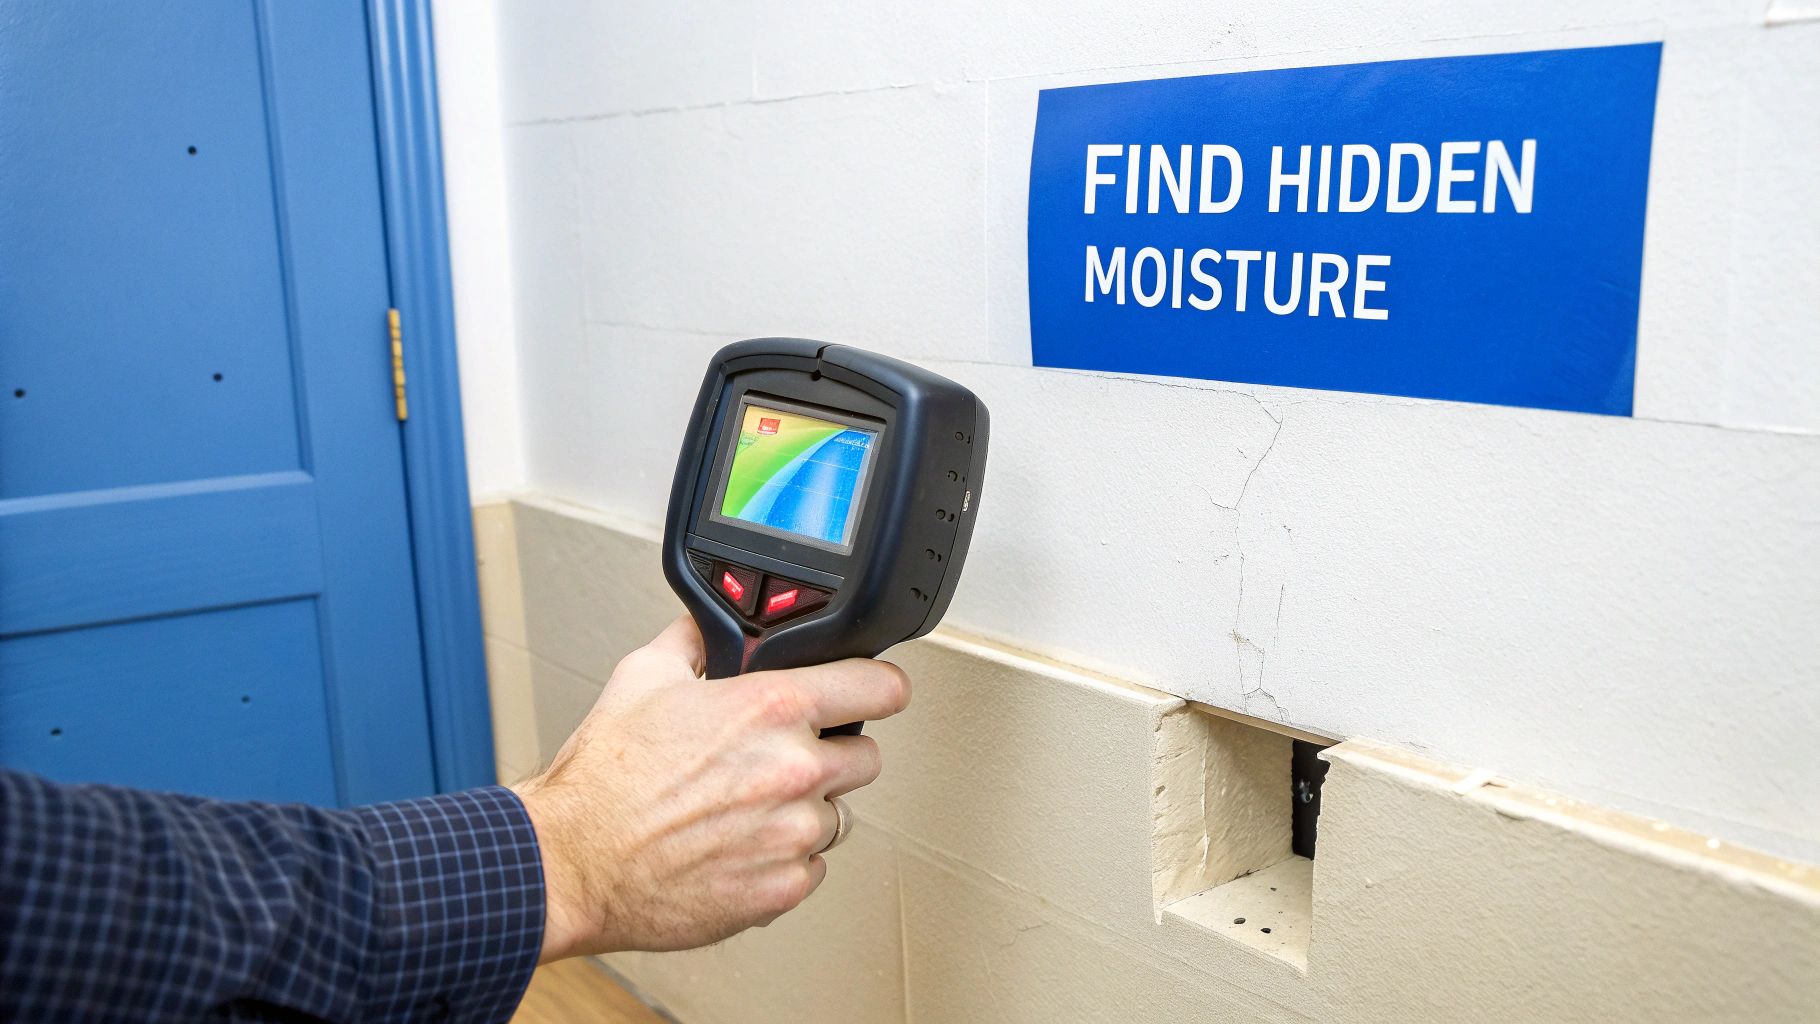
Sometimes, what you can see and smell just isn't the full story. The most destructive mold problems are often the ones you can't see at all, growing silently behind a wall or under a floor that feels perfectly dry to the touch. This is where you have to move beyond your senses and bring in a couple of simple, accessible tools.
These tools are designed to find the one thing mold absolutely needs to survive: moisture. By pinpointing exactly where moisture levels are elevated in your home's building materials, you can find the source of a potential mold colony long before it causes widespread damage.
Pinpointing Problems with a Moisture Meter
A non-invasive moisture meter is one of the most valuable tools in our kit, and they are surprisingly easy for homeowners to use. Unlike the old-school pin-type meters that poke holes in your walls, these devices use sensor pads that send out a low-frequency signal to measure moisture content below the surface of drywall, wood, and plaster.
Think of it like a stud finder, but for water. You just calibrate the meter on a part of the wall you know is dry, then slowly slide it across any area you suspect is damp.
A good workflow looks like this:
- Establish a Baseline: First, find a section of drywall you’re confident is completely dry and take a reading. This is your control number.
- Scan the Suspect Area: Next, move the meter over the wall, ceiling, or floor where you noticed that stain or musty smell.
- Watch for Spikes: Keep a close eye on the readings. A significant jump from your baseline number is a dead giveaway for elevated moisture inside that material.
This method lets you map out the exact boundaries of a water-damaged area, giving you a clear picture of the problem's scale without ever having to cut into your walls. Knowing the precise location of hidden dampness is critical for planning effective moisture intrusion solutions.
A moisture meter doesn’t detect mold directly; it detects the conditions mold needs to grow. Following the trail of high moisture readings is the surest way to find hidden mold colonies.
Seeing Temperature Differences with Thermal Imaging
A thermal imaging camera takes moisture detection to a whole new level. What was once a high-end tool only for professionals is now widely available in affordable models that just attach to your smartphone. This technology doesn't actually see moisture, but it does see the subtle temperature differences that moisture causes.
As wet materials evaporate, they create a cooling effect. A thermal camera displays these cooler areas as dark blue or purple, making them stand out against the warmer, drier surrounding materials that show up as yellow or orange.
This is a complete game-changer for finding issues like:
- Slow plumbing leaks hiding inside a wall or ceiling.
- Missing or settled insulation that's causing condensation.
- Water intrusion sneaking in around window and door frames.
A Real-World Scenario
Imagine you notice the paint on your living room ceiling is starting to bubble just a little bit, but there are no obvious water stains. The area even feels dry to the touch. This is a perfect job for thermal imaging.
You point the camera at the ceiling and immediately see a distinct, dark blue patch that lines up perfectly with the bubbling paint. That cold spot is a strong indication that water is present inside the ceiling, most likely from a slow leak in the upstairs bathroom.
With the thermal camera, you've pinpointed the problem area without any destructive guesswork. Now, you can take your moisture meter and press it right on that spot to confirm the high moisture levels, giving you a complete picture of what's really going on.
DIY Mold Kits vs. Professional Testing: Which Is Right for You?
So, you’ve followed that musty smell, found some suspicious water stains, and your gut is telling you something’s off. The next step is to confirm it. For many homeowners, the first instinct is to grab a DIY mold test kit from the local hardware store. They seem cheap and easy, but this is where a straightforward concern can quickly get complicated.
The real question isn't if these kits work, but what they actually tell you. And frankly, it's not much.
The problem with most DIY kits is that they often create more questions than they answer. They’re designed to tell you if mold spores are present. Here’s the catch: mold spores are always present, both inside and outside. A simple petri dish kit left open in a room is almost guaranteed to grow something. This "positive" result can cause a lot of unnecessary panic without giving you any real information. It doesn’t tell you if the spore levels are abnormally high, what kind of mold it is, or—most importantly—where it’s coming from.
On the flip side, you could have a serious mold problem hiding behind a wall. If that colony isn't actively releasing a ton of spores at the exact moment you run your test, the kit could come back negative. This false sense of security is dangerous because it lets the hidden problem get worse over time.
The Big Limitations of At-Home Mold Kits
Think of a DIY kit as a very blunt instrument. It can confirm the presence of spores but gives you none of the critical context needed to make that information useful. For a deeper dive, check out our guide on choosing the best mold test kit for your home, which explores these drawbacks in more detail.
Here’s what you’re up against with a DIY kit:
- No Context: A positive result can’t distinguish between normal, everyday background spore levels and a genuine infestation that poses a risk.
- No Species Identification: Most off-the-shelf kits won't identify the mold species. Knowing if you're dealing with a common allergen versus a toxigenic mold like Stachybotrys (black mold) is crucial for assessing health risks and planning remediation.
- Major Sampling Errors: The accuracy is entirely up to you. It's incredibly easy to miss a localized problem or contaminate your sample with spores from an open window.
A DIY mold kit is like a car's "check engine" light with no error code. It tells you something might be wrong, but it can’t tell you if it's a loose gas cap or a failing transmission. You're left with an alert but no real diagnosis.
What a Professional Mold Inspection Actually Uncovers
Hiring a certified inspector is a completely different ballgame. This isn’t just about collecting a sample; it's a full-scale investigation into your home’s environmental health. A true professional doesn't just ask, "Is there mold?" They ask, "Why is there mold, where is it, how bad is it, and what kind is it?"
Professionals use controlled, scientific methods to gather real data. This involves using multiple techniques to paint a complete picture. For instance, surface sampling with tape-lifts or swabs can tell us if a discolored spot is actually mold or just dirt.
Air sampling is even more precise. We use a calibrated pump to pull a specific volume of air through a special cassette called a spore trap. That sample goes to an accredited lab, which can then tell us the exact concentration of different mold spores per cubic meter of air. This data is objective and actionable.
Critically, a professional always takes an outdoor "control" sample to establish a baseline for your specific environment. Your indoor samples are then compared against that baseline. A significantly higher indoor spore count is the smoking gun that points to an active, indoor mold source.
Comparing Your Options Side by Side
Making the right choice comes down to what you really need to know. One option gives you a quick, often confusing, answer, while the other delivers a detailed, actionable report to solve the problem for good.
Here’s a look at how DIY kits and professional inspections stack up.
Comparing DIY Mold Kits and Professional Inspections
| Factor | DIY Mold Testing Kits | Professional Mold Inspection |
|---|---|---|
| Accuracy & Reliability | Low. Prone to false positives and negatives. Results are easily misinterpreted. | High. Uses calibrated equipment, control samples, and accredited lab analysis for scientific accuracy. |
| Information Provided | A simple "yes/no" on the presence of mold spores, with little to no context. | A detailed report identifying mold species, spore concentrations, moisture source, and location of growth. |
| Cost | $10 – $50 for the kit, plus potential lab fees ($40 – $100+) for analysis. | $300 – $1,000+ depending on the home's size and the number of samples required. |
| Actionable Next Steps | Unclear. A positive result leaves you wondering what to do next and where the problem is. | Provides a clear roadmap for remediation, often including a scope of work for contractors. |
| Value Proposition | Low initial cost but provides data that is often inconclusive or misleading. | Higher upfront investment but delivers definitive, reliable data needed to solve the problem correctly. |
Ultimately, the choice depends on your goal. If you're just curious, a DIY kit might satisfy that itch. But if you have a genuine concern about your property and your family's health, a professional inspection is the only way to get the clear, reliable answers you need to take effective action.
How to Document Your Findings for Remediation
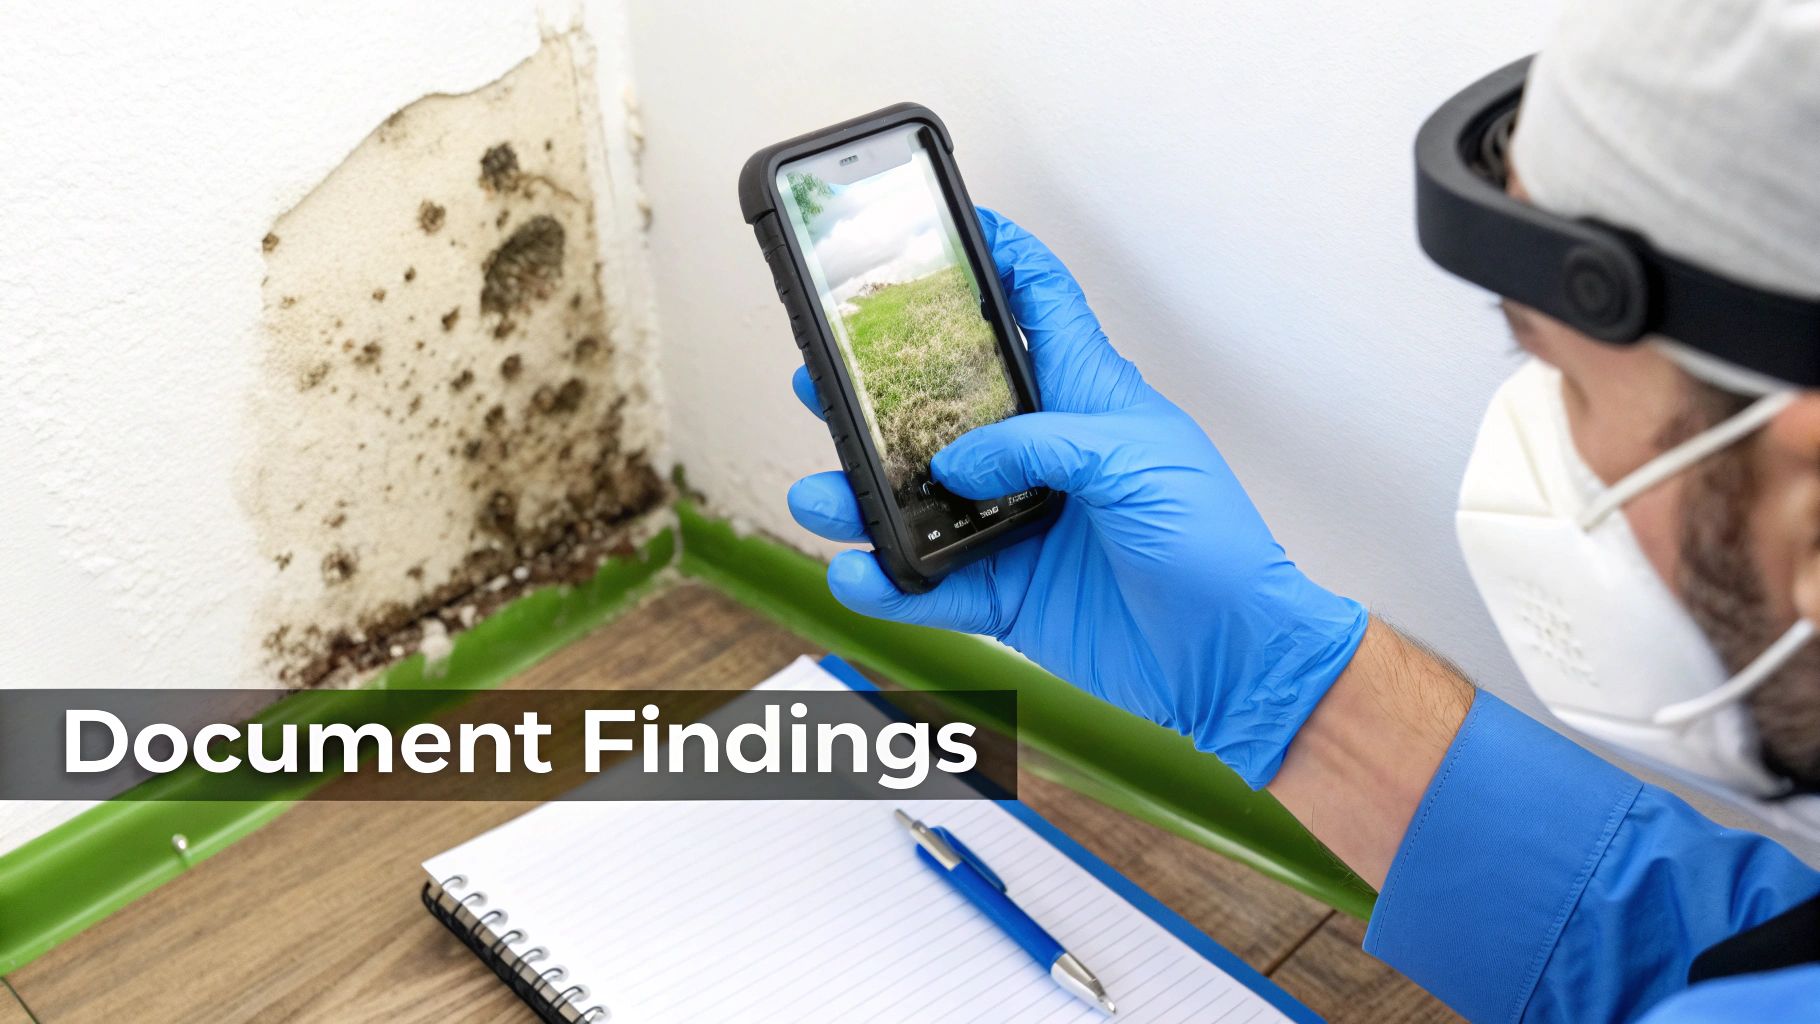
So, you’ve found what looks like mold. That’s a huge first step, but what you do in the next few minutes is critical. Before you touch, clean, or remove anything, you need to become a detective.
Proper documentation is your most powerful tool. It’s the hard evidence that remediation companies and insurance adjusters need, turning your suspicions into a factual record. This isn't about snapping a few quick phone pics; it's about building a clear, organized case file that shows the full extent of the problem. A little effort here will save you major headaches later on.
Create a Clear Photographic Record
Your smartphone camera is your best friend right now. A picture truly is worth a thousand words, especially when it pinpoints the exact location and severity of the growth. But not all photos are created equal.
To build a compelling visual case, follow these simple tips:
- Start Wide: First, take a wide shot of the entire room or wall. This gives crucial context and shows exactly where the mold is located in your home. No one can argue about the location later.
- Get Close: After the wide shot, move in for detailed close-ups of the actual growth. Try to capture its texture and color. For a sense of scale, place a ruler or even a coin next to the patch.
- Find the Source: If you’ve located the moisture source—a slow drip from a pipe, a crack in the foundation, a water stain on the ceiling—photograph that, too. Connecting the mold to its cause is essential for any remediation plan or insurance claim.
Make sure your photos are in focus, well-lit, and timestamped if your phone has that setting. And don't just focus on the mold itself; be sure to capture surrounding damage like warped baseboards, peeling paint, or stained drywall.
Keep a Detailed Written Log
While pictures provide the visual proof, a written log tells the full story. This is your running record of everything you observe, and it doesn’t have to be fancy—a simple notebook or a document on your computer works perfectly.
For each area you find, jot down these key details:
- Date and Time: Note when you first discovered the issue and each time you add a new entry.
- Specific Location: Be precise. Instead of "bathroom," write "under the sink cabinet in the upstairs guest bathroom."
- Detailed Descriptions: Describe what you see and smell. For example: "A patch of black, fuzzy mold about 6 inches across. Strong musty odor is noticeable when the cabinet is open."
- Moisture Readings: If you're using a moisture meter, record the numbers. Note the baseline reading you got from a dry area and the elevated reading from the problem spot.
This detailed log is your timeline of evidence. It demonstrates that you’ve been diligent and methodical, which is incredibly valuable when you start talking to professionals.
Always Put Safety First
As you investigate and document, protecting yourself is non-negotiable. Disturbing a mold colony, even accidentally, can release a cloud of spores into the air, creating a real health risk.
Before you get started, make sure you're wearing the right personal protective equipment (PPE):
- An N95 respirator mask to avoid inhaling spores.
- Gloves to prevent any skin contact.
- Goggles or safety glasses to protect your eyes.
This is not the place to cut corners. Your health is the absolute top priority. This systematic approach mirrors the thoroughness a professional would bring to the job. In fact, you can see how these steps align with a professional mold inspection process in Santa Barbara, CA. Taking these precautions ensures your findings are solid and, more importantly, that you stay safe.
Still Have Questions About Mold?
Once you've done an inspection, it's completely normal to have more questions pop up. You might be wondering about something you found, or maybe you're worried about what you didn't find. Let's tackle some of the most common questions we hear from homeowners.
Getting clear, straightforward answers is the best way to move forward with confidence.
What's the Real Difference Between Mold and Mildew?
People often use these terms interchangeably, but they’re not the same thing. Think of it this way: mildew is the annoying cousin, while mold is the destructive one you don't want in your house.
Mildew is a surface-level fungus, usually showing up as a powdery gray or white patch on things like shower curtains or damp windowsills. You can typically scrub it off with a household cleaner.
Mold is the bigger problem. It can be fuzzy or even slimy and comes in all sorts of colors—green, blue, or the infamous black. The real issue is that mold doesn't just sit on the surface; it digs its roots deep into materials like drywall, insulation, and wood. This can cause serious structural damage and pose greater health risks, often requiring professional help to get rid of for good.
Is It Okay to Just Paint Over Mold?
Absolutely not. This is one of the biggest—and most costly—mistakes we see homeowners make.
Painting over mold is like putting a band-aid on a broken arm. You're hiding the problem, but you're not fixing it. In fact, you’re making it worse. The paint traps moisture against the wall, creating the perfect environment for the mold to feast and grow even faster right underneath.
Sooner or later, it will push its way through the new paint, and the problem will be even more widespread. Always, always, always fix the moisture source and have the mold properly removed before you even think about picking up a paintbrush.
I Smell That Musty Odor but Can't See Any Mold. What Now?
Trust your nose. That distinct, musty smell is a massive red flag for hidden mold. Your senses are often your best detection tool, and if you smell it, it's growing somewhere.
The source is likely hiding out of sight—inside a wall cavity, under the floorboards, or deep within your HVAC system. Start by looking for subtle signs of water damage where the smell is strongest. Check for faint water stains on the ceiling, peeling paint, or warped baseboards. Don't forget to look under sinks and behind appliances like your dishwasher or washing machine.
If you’ve searched everywhere and still can't pinpoint the source, it’s time to call in a professional. They have tools like moisture meters and thermal imaging cameras that can find hidden moisture without tearing your walls apart.
When you can smell mold but can't see it, you're not imagining things. You're detecting the Microbial Volatile Organic Compounds (MVOCs) that mold releases as it grows. This is a definitive sign of an active colony that needs to be found and addressed.
How Much Should I Expect to Pay for a Professional Mold Inspection?
Investing in a professional inspection is one of the smartest things you can do—it can save you a world of headaches and money down the line. The cost really depends on the size of your home and how complex the situation is, but a solid visual inspection typically runs from $300 to $600.
If the inspector recommends taking air or surface samples for lab analysis, the total cost could be anywhere from $600 to over $1,000. While the mold detection service market faces challenges like pricey testing and a flood of inaccurate DIY kits, more and more people recognize that professional testing is a necessary investment. It gives you definitive answers on what type of mold you have and how bad the problem is—critical information for planning a successful remediation.