That faint musty odor, the small stain you’ve been ignoring, or the almost invisible bubbling in your paint are not just minor cosmetic flaws. They are often the first whispers of a significant problem: water damage silently compromising your home's structure and indoor air quality. For homeowners in coastal California, where persistent humidity and seasonal rains create the perfect storm for moisture intrusion, knowing what to look for isn't just smart, it's essential for protecting your investment and your health.
This definitive guide is designed to empower you. We will walk you through the nine critical signs of water damage in walls, moving from the glaringly obvious to the cleverly concealed. Ignoring these clues can lead to severe structural rot, costly repairs, and potential health hazards from mold growth. Understanding these indicators is the first and most crucial step in preventing a minor leak from escalating into a major disaster.
You will learn to not only identify these signals but also to interpret them. This article will equip you with the knowledge to:
- Recognize subtle visual and olfactory cues of hidden moisture.
- Assess the potential severity of the damage.
- Understand the risks associated with unchecked water intrusion.
By the end of this list, you will be transformed from a worried homeowner into a proactive guardian of your property. You will have the confidence to spot problems early, understand their implications, and know precisely when to take decisive action, including when to call in professionals like Pacific Mold Pros for a thorough inspection. Let's decode what your walls might be trying to tell you.
1. Discoloration and Staining
One of the most common and earliest visible signs of water damage in walls is the appearance of unexpected discoloration or stains. These marks are not just cosmetic issues; they are tell-tale indicators that moisture has breached the surface of your drywall or plaster. When water seeps into a wall, it carries minerals and dirt with it. As the water evaporates, it leaves these deposits behind, creating characteristic stains that can range in color from light tan and yellow to dark brown or even black.
These stains often appear as irregular splotches, streaks running down the wall, or distinct "tide lines" that show how high the water reached. In many cases, especially in humid coastal California environments, this discoloration is not just mineral deposits but the first sign of mold growth. Certain mold species thrive in damp, dark wall cavities, and the stain you see is the colony becoming visible on the surface. Understanding the nature of this discoloration is a critical first step. You can learn more about how to detect mold and distinguish it from simple water stains.
Common Examples of Water Stains
- Ceiling Corners: Noticeable ring-shaped, yellowish-brown stains in the corners where the wall meets the ceiling, often indicating a slow roof leak.
- Near Windows and Doors: Streaks or splotches appearing on the wall directly below or beside a window frame, especially after heavy rainfall.
- Basement Walls: Large, map-like brown stains on lower sections of concrete or drywall in a basement, pointing to groundwater seepage or foundation issues.
Actionable Diagnostic Tips
If you spot discoloration, don't just paint over it. Use these proactive steps to investigate:
- Photograph and Document: Take clear photos of the stain, noting its size, shape, and location. This creates a baseline to track any changes.
- Mark the Perimeter: Use a pencil or painter's tape to lightly outline the stain's edges. Check back after a few days or the next rainstorm to see if it has grown.
- Confirm with a Moisture Meter: A non-invasive moisture meter is an excellent tool to confirm if the area is still actively damp, even if it feels dry to the touch. This provides definitive proof of a moisture problem.
2. Peeling or Bubbling Paint
Beyond staining, another one of the most visible signs of water damage in walls is a change in the paint's texture. When paint begins to blister, bubble, or peel away from the wall surface, it's a clear signal that moisture has infiltrated the area. Water trapped between the drywall or plaster and the paint layer breaks down the adhesive bond, causing the paint to separate and lift. This creates the characteristic bubbles and eventually leads to large flakes peeling off completely.
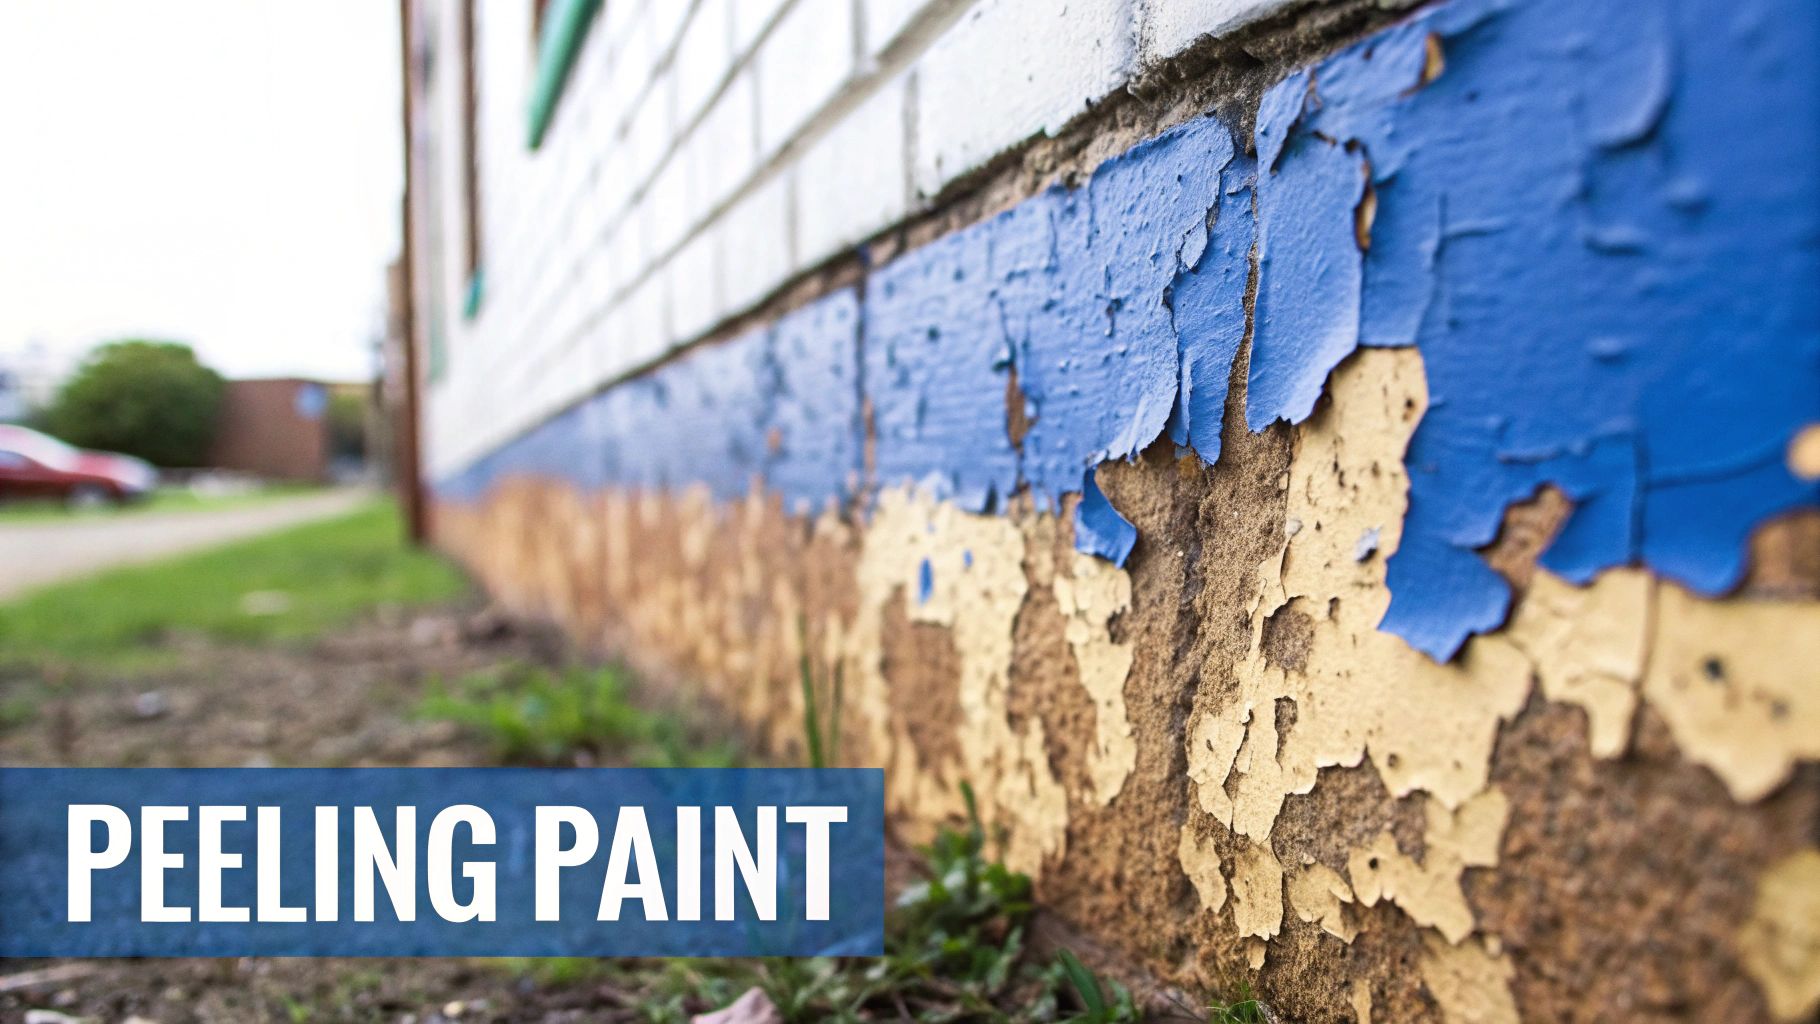
This phenomenon occurs because the liquid moisture pushes outward against the non-porous paint layer. As the pressure builds, the paint stretches to form a bubble or blister. In high-humidity environments common in coastal California, this can also be a slow process caused by chronic condensation. Ignoring these signs can lead to widespread paint failure and allow the underlying wall material to deteriorate further. Addressing the root cause of the moisture is essential before any cosmetic repairs are attempted.
Common Examples of Peeling or Bubbling Paint
- Bathroom Walls: Blistering or flaking paint near showers or bathtubs, often caused by poor ventilation and consistent steam exposure.
- Around Windows: Paint peeling along the bottom or sides of a window frame, indicating a leak in the window seal that allows rainwater to seep in.
- Near Baseboards: Bubbling paint at the bottom of a wall, which could point to a plumbing leak within the wall or moisture wicking up from a damp foundation.
Actionable Diagnostic Tips
Never simply scrape and repaint over bubbled areas. This cosmetic fix traps the moisture and guarantees the problem will return. Use these steps to diagnose the issue first:
- Gently Probe the Bubble: Carefully press on a bubble. If it feels soft or water seeps out, you have an active moisture problem.
- Inspect the Source: Look directly above or adjacent to the peeling paint for the potential source, such as a leaky pipe, roof flashing, or window seal.
- Address the Cause, Then Repair: Once you've identified and fixed the moisture source, allow the wall to dry completely. Only then should you scrape the old paint, patch, prime with a moisture-resistant primer, and repaint.
3. Soft or Spongy Drywall
Beyond visual cues like stains, one of the most serious signs of water damage in walls is a change in the wall's physical integrity. When drywall feels soft, spongy, or crumbles under slight pressure, it means moisture has thoroughly saturated the gypsum core, compromising its structural strength. This is a critical indicator that the water damage is not superficial but has penetrated deep into the wall materials, leading to their decomposition.
This softening happens because drywall is essentially gypsum powder pressed between two sheets of paper. When saturated, the gypsum turns into a paste-like substance, losing all its rigidity and strength. Ignoring this sign can lead to sections of the wall collapsing and indicates a long-term moisture problem that has likely fostered significant hidden mold growth within the wall cavity. Such hidden moisture can be challenging to locate, which is why professionals often use thermal imaging for home inspections to pinpoint temperature differences caused by trapped water.
Common Examples of Soft Drywall
- Bathroom Walls: Areas around showers, tubs, and toilets that feel soft due to chronic steam, condensation, or a slow plumbing leak.
- Basement Walls: Lower sections of drywall that feel damp and spongy to the touch, often a symptom of persistent groundwater seepage through the foundation.
- Below Windows: Drywall directly beneath a window sill that has degraded and become soft after repeated water intrusion from a failed window seal during rainstorms.
Actionable Diagnostic Tips
If you suspect a wall has softened, proceed with caution to assess the damage:
- Perform a Gentle Press Test: Gently but firmly press on the suspect area with your fingers. Compare the feeling to a known dry section of the wall. Note any give, sponginess, or crumbling.
- Mark Soft Sections: Use a pencil or painter's tape to outline the perimeter of the affected area. This helps you and any future inspectors understand the full extent of the damage.
- Document with Photos: Take clear pictures of the soft areas, including any visible sagging or bulging. This documentation is crucial for insurance claims and professional assessments.
- Avoid Excessive Probing: Do not push hard or attempt to break through the wall, as this can worsen the damage and potentially release hidden mold spores into the air.
4. Mold or Mildew Growth
Beyond simple staining, one of the most serious signs of water damage in walls is the visible presence of mold or mildew. These fungi are not just surface blemishes; they are living organisms that thrive in damp, dark environments created by water intrusion. If you see fuzzy or slimy patches that are black, green, white, or even pink, it's a clear confirmation that a persistent moisture problem exists within the wall cavity. Mold can begin to colonize within just 24 to 48 hours of water exposure, making it a fast-developing and significant health hazard.
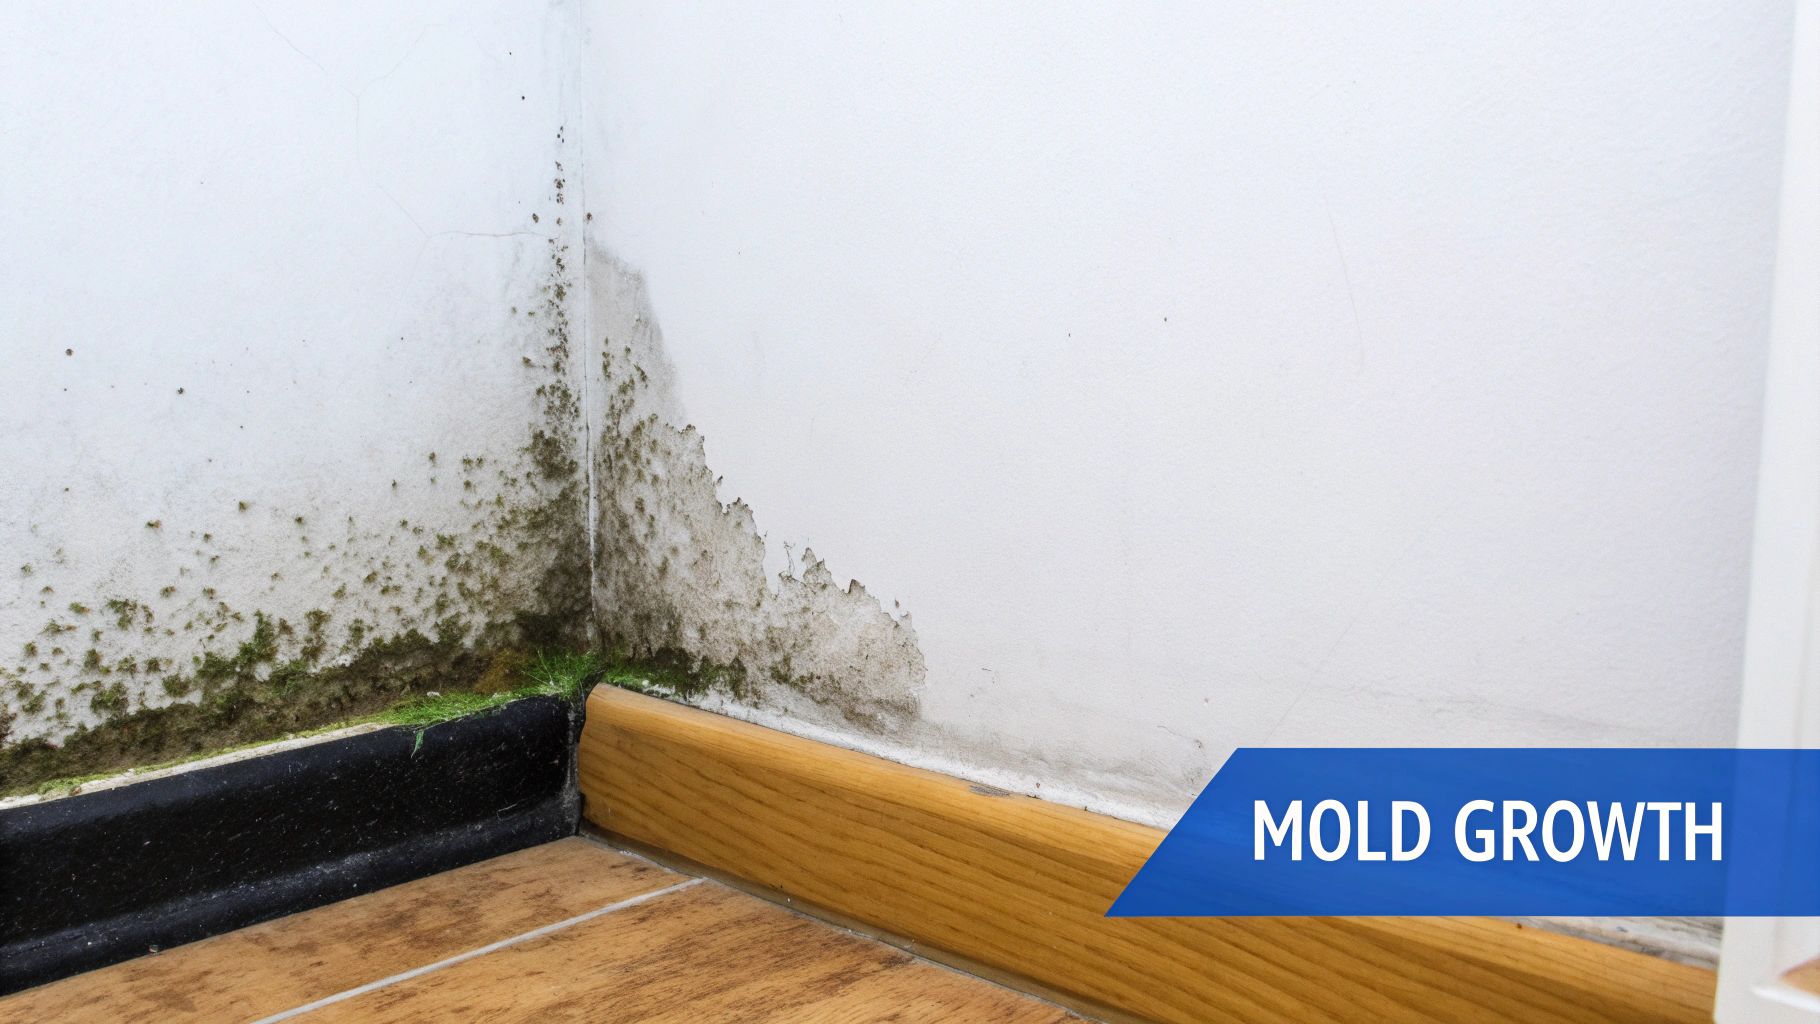
The appearance of mold indicates that the underlying materials, such as drywall paper and wood studs, have been saturated long enough to support a fungal colony. This not only poses risks to your home's structural integrity but also to your indoor air quality, as mold releases spores that can cause allergic reactions and respiratory issues. According to EPA guidelines, any mold growth should be addressed promptly and safely. It is critical to find out how to check for mold after water damage to understand the full scope of the contamination before attempting any cleanup.
Common Examples of Mold Growth
- Bathroom and Kitchen Corners: Spidery black mold colonies appearing in shower corners, along tile grout lines, or under sinks where small, persistent leaks occur.
- Basement Walls: Patches of green or white mold on the lower portions of drywall or concrete walls, especially in areas with a history of minor flooding or high humidity.
- Behind Furniture or Appliances: Growth discovered on the wall behind a large piece of furniture, a washing machine, or a refrigerator where airflow is restricted and condensation can build up.
Actionable Diagnostic Tips
Visible mold requires a cautious approach to avoid cross-contamination and health risks.
- Do Not Disturb: Avoid touching, scrubbing, or disturbing the mold, as this can release a high concentration of spores into the air.
- Document and Isolate: Take clear photos from a safe distance for professional assessment. If possible, close off the affected room and shut down HVAC systems that could spread spores.
- Ensure Proper Ventilation: When investigating the area, improve ventilation by opening a window to the outside, but be careful not to create drafts that blow directly on the mold.
- Seek Professional Remediation: Contact a certified mold remediation specialist for proper testing and removal. They possess the equipment, like HEPA vacuums and air scrubbers, and follow IICRC protocols to safely eliminate the mold and address its water source.
5. Warping or Buckling
When moisture deeply saturates drywall, plaster, or the underlying wood framing, it can cause the materials to swell and lose their structural integrity. This leads to one of the more severe signs of water damage in walls: warping or buckling. Unlike a simple stain, a wall that is visibly bowed, wavy, or bulging outward is a clear indication that the damage is no longer just cosmetic but has compromised the wall's structure. This phenomenon occurs because materials like wood and drywall expand as they absorb water, creating immense internal pressure that forces the surface to deform.
This type of damage signals a significant and often prolonged moisture problem that has moved beyond the surface and into the core of the wall assembly. Ignoring a warped wall can lead to serious safety hazards, including potential structural failure. Understanding the source of the moisture is critical, as it points to a major breach in the building's defenses against water. You can discover more about comprehensive moisture intrusion solutions to address the root cause of such severe damage.
Common Examples of Warping and Buckling
- Basement Walls: Lower sections of drywall or paneling may bow inward after prolonged groundwater seepage or a sump pump failure.
- Exterior-Facing Walls: Interior surfaces of walls exposed to heavy, wind-driven rain can begin to show a wavy texture or bulge as moisture penetrates the siding and sheathing.
- Walls After Flooding: Following a major leak or flood, entire sections of drywall can buckle dramatically as the studs and panels absorb large volumes of water and then begin to dry unevenly.
Actionable Diagnostic Tips
A warped wall requires immediate and careful assessment. Do not attempt to push it back into place.
- Document the Deviation: Use a long, straight edge or a laser level held against the wall to measure and photograph the extent of the bowing. This documentation is crucial for insurance claims and professional assessments.
- Monitor for Progression: Place a piece of tape or make a small chalk mark at the most prominent point of the bulge. Check it daily to see if the warping is actively worsening.
- Ensure Safety: Avoid leaning anything against the affected wall or placing heavy furniture nearby. The structural integrity is compromised, and added stress could worsen the situation.
- Consult a Professional Immediately: Due to the structural implications, a warped wall should be assessed by a qualified professional, such as a structural engineer or a water damage restoration specialist, without delay.
6. Efflorescence (White Crystalline Deposits)
Often mistaken for white mold, efflorescence is a crystalline deposit of salts that can appear on the surface of concrete, brick, or masonry walls. This chalky, powdery substance is a definitive sign of water damage in walls, indicating that moisture is traveling through the building materials. As water seeps through the wall, it dissolves natural mineral salts within the concrete or brick. When the water reaches the surface and evaporates, it leaves these salt deposits behind.
While efflorescence itself is not harmful, its presence is an undeniable red flag for an underlying and persistent moisture problem. In the humid coastal environments of Santa Barbara and Ventura, this often points to issues like groundwater intrusion, plumbing leaks within concrete slabs, or poor exterior waterproofing. Ignoring it means the water intrusion continues, which can lead to more severe structural damage and create the perfect conditions for mold growth. Distinguishing between efflorescence and white mold is critical, as they require different remediation strategies.
Common Examples of Efflorescence
- Basement and Foundation Walls: Powdery white or crystalline patterns on the lower sections of concrete walls, signaling hydrostatic pressure pushing groundwater through the foundation.
- Brick or Stucco Exteriors: Fluffy, salt-like deposits appearing on exterior brickwork, especially after periods of heavy rain, indicating moisture absorption.
- Crawl Spaces: Chalky residue on concrete support pillars or perimeter walls, a common symptom of high humidity and poor ventilation below the home.
Actionable Diagnostic Tips
If you find efflorescence, you've found clear evidence of water migration. Here’s how to investigate further:
- Dry Brush Removal: Use a stiff-bristled brush or a vacuum with a brush attachment to remove the deposits. Avoid using water, as this will simply dissolve the salts back into the masonry, causing them to reappear later.
- Monitor for Recurrence: After cleaning the area, check back regularly, especially after rain or changes in humidity. If the efflorescence returns, it confirms an active water source.
- Identify the Source: Trace the location of the efflorescence back to potential moisture sources. Is it below a bathroom? Near a downspout? On a wall facing a poorly graded landscape?
- Confirm with Professional Testing: Since efflorescence and white mold can look similar, a professional inspection is the surest way to confirm what you're dealing with and assess the full extent of the moisture problem.
7. Odor (Musty or Moldy Smell)
Often, your nose will detect a problem long before your eyes do. A persistent musty, earthy, or moldy smell is one of the most reliable signs of water damage in walls, even when no visible evidence exists. This distinct odor is not just stale air; it's caused by the metabolic processes of mold and mildew colonies thriving on damp organic materials like drywall paper, wood studs, and insulation hidden within your wall cavities.
This smell signifies an active microbial growth problem. As mold consumes materials, it releases microbial volatile organic compounds (mVOCs), which produce that characteristic musty scent. Ignoring this olfactory warning allows the underlying moisture issue and mold contamination to worsen, potentially impacting both your home's structural integrity and your indoor air quality.
Common Examples of Musty Odors
- Bathroom Walls: A constant damp, mildewy smell in a bathroom, even when it's dry, often points to a slow leak behind the shower tiles, under the sink, or around the toilet.
- Basements and Crawl Spaces: A pervasive earthy or soil-like odor in a basement is a classic indicator of moisture seeping through foundation walls, creating a prime environment for mold.
- Near HVAC Vents: If a musty smell is stronger when your heating or air conditioning runs, it could indicate moisture and mold growth within the ductwork or around the air handler unit.
Actionable Diagnostic Tips
If you detect a suspicious odor, trust your senses and investigate immediately.
- Pinpoint the Source: Try to identify the room or specific area where the smell is strongest. This helps narrow down the search for the hidden moisture source.
- Check for Other Clues: Use the odor's location as a starting point to look for other subtle signs, such as minor wall discoloration, high humidity levels, or peeling wallpaper in the vicinity.
- Inspect HVAC System: Check your HVAC filter for dark, spotty discoloration, which can indicate mold spores are circulating through your home's air.
- Never Mask the Smell: Using air fresheners or candles only covers up the problem. The priority is to address the cause, as a persistent smell is a clear signal of an ongoing issue. You can learn more about how to get rid of a mold smell by tackling its root cause.
8. Visible Moisture, Dampness, or Wet Spots
Perhaps the most direct and undeniable of all signs of water damage in walls is the presence of visible moisture. While other signs are the aftermath of a water event, seeing or feeling wetness on a wall indicates an active problem that is happening right now. This could manifest as beads of condensation, dark, damp-looking patches, or even trickles of water running down the surface. Ignoring this is not an option, as it confirms ongoing water intrusion that is actively degrading your home's materials and creating a prime breeding ground for mold.
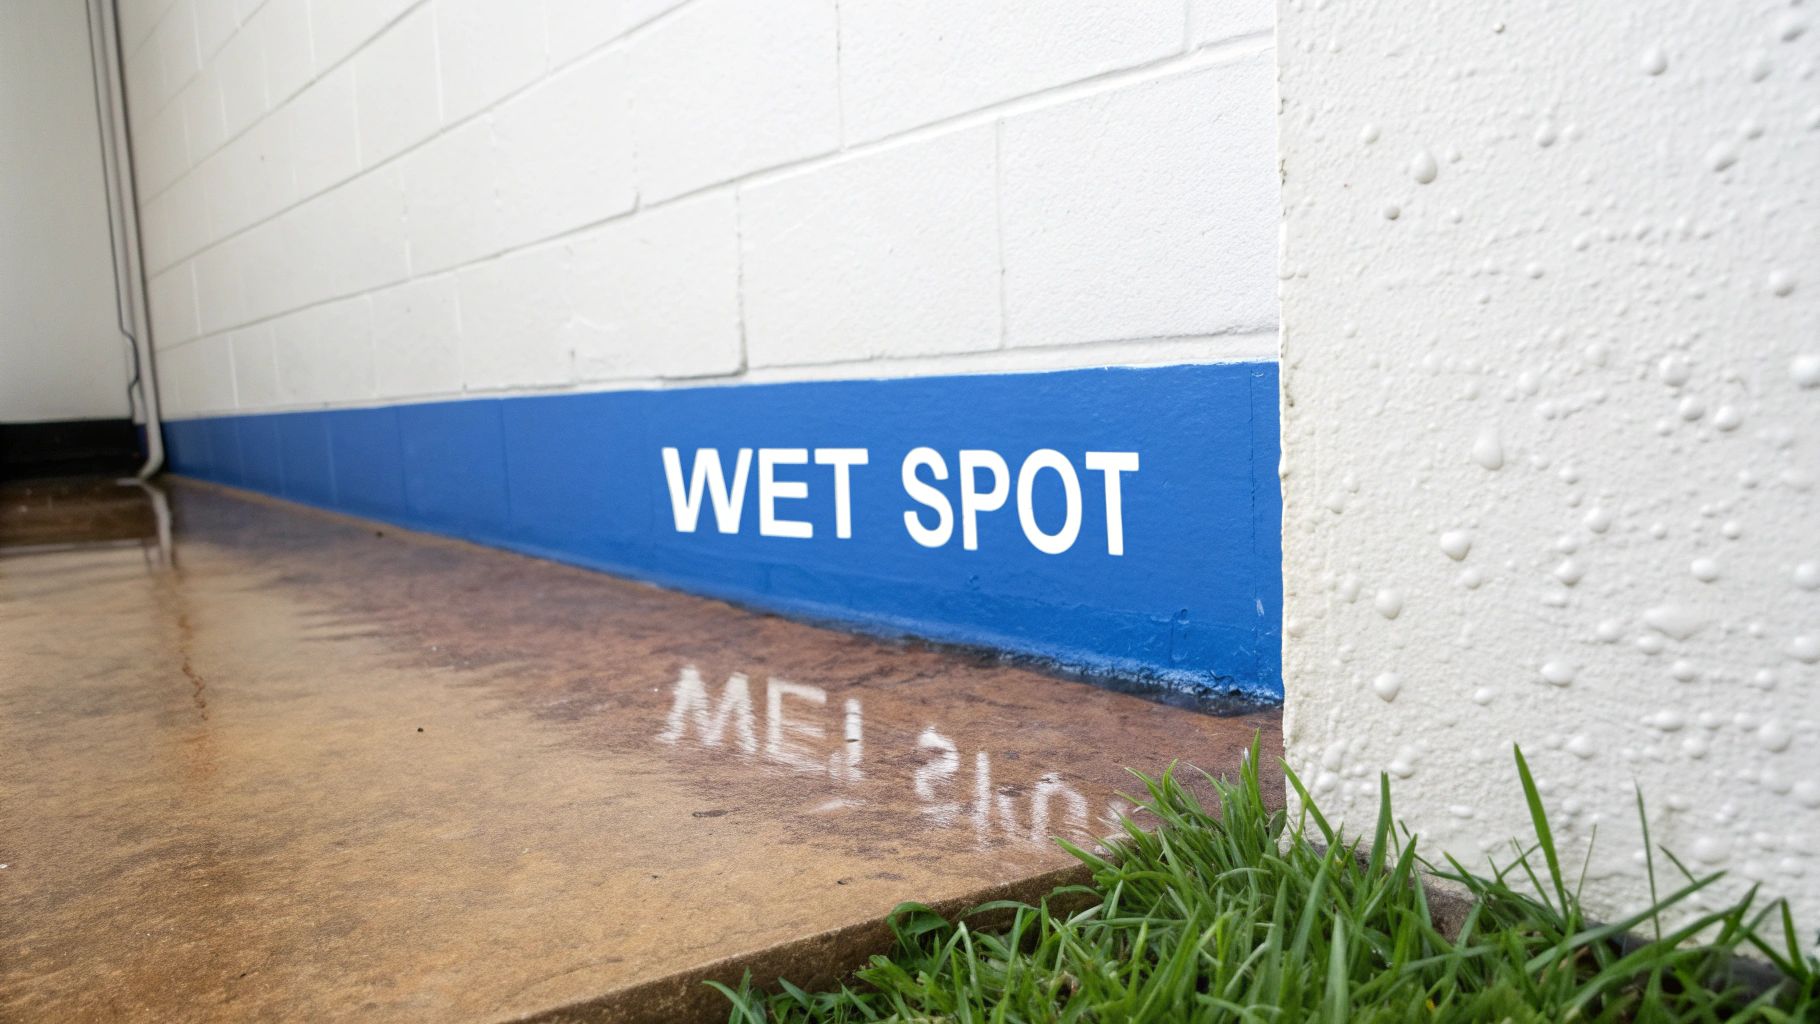
Unlike a dried stain, a wet spot tells you the source of the moisture is still present and needs immediate attention. It could be from a burst pipe, a severe roof leak during a storm, or persistent condensation common in coastal California homes. The location of the dampness provides crucial clues about its origin. A wet wall in the basement after heavy rain points to foundation issues, while moisture around a bathroom fixture likely indicates a plumbing leak. Swift action is necessary to prevent structural damage and the rapid onset of mold growth.
Common Examples of Visible Moisture
- Basement and Foundation Walls: Dark, damp patches or visible water seeping through concrete or drywall during or after significant rainfall.
- Interior Walls Near Plumbing: Wetness appearing on a wall that backs onto a shower, toilet, or kitchen sink, signaling a potential pipe leak.
- Exterior-Facing Walls: Beads of condensation forming on the surface of walls, especially in rooms with high humidity like bathrooms or poorly ventilated areas.
Actionable Diagnostic Tips
If you find a wet spot on your wall, the situation is urgent. Take these immediate diagnostic and mitigating steps:
- Confirm with Touch and Tools: Carefully touch the area to confirm it is damp. Use a moisture meter to get a quantitative reading of the moisture content, which helps in assessing severity.
- Identify the Source Quickly: Try to trace the moisture to its origin. Check nearby pipes, appliances, windows, and the roof or attic space directly above the wet area.
- Contain and Dry: Place a bucket or towels to catch any dripping water. Aim fans at the damp area to promote air circulation and begin the drying process while you investigate further.
- Document Everything: Take clear photos and videos of the wet spot, its location, and any potential sources. This documentation is invaluable for insurance claims and professional assessments.
9. Cracks or Separation in Drywall/Plaster
While hairline cracks can be a normal part of a home settling, new or expanding cracks are often subtle yet significant signs of water damage in walls. When building materials like drywall, plaster, and wood framing absorb water, they expand. As they dry, they contract. This repeated cycle of expansion and contraction puts immense stress on the materials, leading to fractures and separation along seams and joints. These are not merely cosmetic flaws; they can indicate a persistent moisture problem that is compromising the structural integrity of your wall system.
The presence of water weakens the gypsum core of drywall and can cause plaster to lose its bond with the lath beneath. This structural weakening manifests as cracks that may appear suddenly or grow over time. Ignoring these signs allows the underlying water issue to worsen, potentially leading to more severe damage, including foundation problems or framing decay, especially critical in seismically active areas of California. Understanding why these cracks appear is the first step toward a proper diagnosis and repair.
Common Examples of Water-Related Cracks
- Corner and Seam Cracks: Fine vertical or horizontal cracks appearing along drywall seams or where walls meet the ceiling, often indicating a slow roof or plumbing leak from above.
- Horizontal Basement Cracks: Long, horizontal cracks on basement foundation walls can be a sign of hydrostatic pressure, where water-saturated soil pushes against the foundation.
- Separation from Framing: Visible gaps or separation forming between the baseboard and the wall or between the wall and a window frame, caused by the swelling and shrinking of waterlogged wood.
- Spiderweb or Map Cracks: A network of fine, intersecting cracks on a plaster or drywall surface, which can occur as the material weakens and pulls apart due to moisture saturation.
Actionable Diagnostic Tips
If you discover new or widening cracks, proceed with a careful investigation before reaching for spackle:
- Photograph and Measure: Document the crack with clear photos. Use a ruler to measure its length and width at several points. This creates a crucial baseline for monitoring.
- Use Tape Markers: Place a piece of masking tape across the crack and mark the date. If the tape tears or wrinkles, it confirms the crack is actively growing.
- Probe the Surrounding Area: Gently press on the wall around the crack. If it feels soft, damp, or crumbly, it confirms that moisture is present and has compromised the material's integrity.
- Check with a Moisture Meter: Use a moisture meter on and around the cracked areas. High readings will confirm that water is the root cause, not just normal settling.
9-Point Comparison: Signs of Water Damage in Walls
| Sign | 🔄 Complexity (process) | ⚡ Resource needs (speed/effort) | ⭐ Expected outcomes (quality/impact) | 💡 Ideal use cases (tips) | 📊 Key advantages |
|---|---|---|---|---|---|
| Discoloration and Staining | Low — visual inspection, low technical skill | Low — camera, moisture meter optional | Moderate — early detection of moisture paths ⭐⭐ | Track progression with photos; check after rain 💡 | Visible, easy to find; pinpoints likely problem areas 📊 |
| Peeling or Bubbling Paint | Medium — needs moisture source diagnosis 🔄 | Medium — inspection, possible material removal ⚡ | High — indicates active/recent moisture; repair needed ⭐⭐⭐ | Do not repaint until source fixed; poke bubbles to test 💡 | Highly visible; signals urgent remediation before spread 📊 |
| Soft or Spongy Drywall | Medium — tactile inspection; may require probe 🔄 | High — professional assessment, likely replacement ⚡ | Very high — structural compromise; replacement likely ⭐⭐⭐⭐ | Press in grid, mark areas for pro evaluation; limit contact 💡 | Clear sign of severe moisture; directs structural repair need 📊 |
| Mold or Mildew Growth | Low–Medium — visible but hazardous to sample 🔄 | High — PPE, testing, certified remediation often needed ⚡ | Very high — health risk and established moisture problem ⭐⭐⭐⭐ | Do not disturb; document and hire specialists; ventilate safely 💡 | Definitive indicator of moisture and health concern; forces action 📊 |
| Warping or Buckling | High — structural assessment required 🔄 | Very high — engineering, reconstruction, possible permits ⚡ | Critical — severe structural damage; safety risk ⭐⭐⭐⭐⭐ | Measure deviation, stop using affected areas, contact structural pro 💡 | Obvious structural failure needing immediate professional response 📊 |
| Efflorescence (White Deposits) | Low — visual recognition, simple cleaning 🔄 | Low–Medium — brushing, moisture testing, sealing later ⚡ | Moderate — shows water migration paths; not immediately dangerous ⭐⭐ | Dry-brush, photograph, use deposits to trace moisture source 💡 | Non-destructive indicator of hidden moisture; guides investigation 📊 |
| Odor (Musty/Moldy Smell) | Low — olfactory detection but non-specific 🔄 | Low — human detection, may need specialized locating tools ⚡ | Moderate — early warning of hidden moisture and mold ⭐⭐ | Use odor to guide moisture meter/thermal imaging; avoid masking smells 💡 | Early alert before visual signs; prompts targeted inspection 📊 |
| Visible Moisture / Wet Spots | Low — obvious, direct evidence 🔄 | Medium — moisture meters, immediate mitigation resources ⚡ | Very high — active intrusion requiring emergency response ⭐⭐⭐⭐ | Use moisture meters/thermal imaging; call remediation pros immediately 💡 | Definitive proof of active water; exact location for remediation 📊 |
| Cracks or Separation in Drywall/Plaster | Medium — inspect and measure; may need experts 🔄 | Medium–High — monitoring tools, possible structural evaluation ⚡ | Variable — can indicate early to severe issues depending on pattern ⭐⭐–⭐⭐⭐⭐ | Photograph and monitor cracks; use moisture meter and consult engineer if >1/4" 💡 | Alerts to structural stress; diagnostic when combined with other signs 📊 |
From Detection to Solution: Your Next Steps for a Healthy, Dry Home
You have now journeyed through the critical visual, tactile, and olfactory clues that your home uses to signal distress. From the subtle yellowing of a corner to the unmistakable musty odor that greets you at the door, each of these signs of water damage in walls is a vital piece of a larger puzzle. Recognizing these indicators is more than just a homeowner skill; it's a fundamental practice in preserving your property's structural integrity and safeguarding your family's health. You’ve moved beyond simply noticing a problem to understanding what it means, and that knowledge is your most powerful tool.
The journey doesn't end with detection. Identifying peeling paint, efflorescence, or a soft spot on the drywall is the crucial first step, but the decisive action you take next is what truly defines the outcome. Delay can transform a manageable issue into a complex, expensive remediation project involving structural repairs and extensive mold abatement.
A Recap of Your Diagnostic Toolkit
Let's distill the core lessons from this guide into a clear, actionable summary. Mastering these concepts is the key to proactive home maintenance and protecting your investment, especially in the unique coastal climate of Santa Barbara and Ventura Counties.
- Trust Your Senses: Your eyes, nose, and sense of touch are your frontline defense. A faint, persistent musty smell or a wall that feels cool and damp are often the earliest warnings of a hidden leak or moisture intrusion. Never dismiss these sensory clues.
- Context is Crucial: The location of the damage provides invaluable information. Stains on a ceiling below a bathroom point to a plumbing or fixture leak. Discoloration near windows, particularly in our coastal region, often signals failed seals or condensation issues.
- Damage Has a Spectrum: You now understand how to categorize what you see, from minor (small, dry stains) to moderate (peeling paint, soft spots) and urgent (visible mold, bulging walls). This triage system helps you prioritize your response and understand when to call for professional help immediately.
Your Action Plan: Moving from Concern to Clarity
So, what do you do now? If you've walked through your home and checked off one or more of the signs discussed, it's time to transition from observation to action. Uncertainty is the enemy of a healthy home.
Key Insight: The visible signs of water damage in walls often represent only a fraction of the actual problem. The moisture source and the full extent of its spread are typically hidden within the wall cavity, making a professional assessment essential.
Here is a clear, step-by-step plan to follow:
- Document Everything: Before you touch anything, take clear photos and videos of the affected areas. Note the date and the specific conditions (e.g., "after last night's rain"). This documentation is invaluable for insurance claims and for providing a clear history to professionals.
- Avoid Destructive DIY: Resist the urge to tear into a wall or scrape away moldy patches yourself. Doing so can release mold spores into your home's air, creating a significant health hazard and potentially spreading the contamination to other areas.
- Seek a Professional Diagnosis: This is the most critical step. You wouldn't diagnose a serious medical issue without a doctor, and the same logic applies to the health of your home. A superficial glance is not enough. You need concrete data to make informed decisions.
For homeowners in Santa Barbara and Ventura, the path to clarity is straightforward. The certified inspectors at Pacific Mold Pros are equipped with advanced diagnostic technology, including thermal imaging cameras and non-invasive moisture meters, to see what you can't. We don't just find the damage; we trace the moisture back to its source, providing you with a complete picture of the situation. Our lab-certified reports remove all guesswork, detailing the type and concentration of any mold present and outlining a precise, actionable plan for remediation.
Don't let a small concern grow into a major crisis. By recognizing the signs of water damage in walls and acting decisively, you are taking control of your home's future. You are choosing to protect your property, your financial investment, and most importantly, the well-being of those you share it with. Your peace of mind is paramount.
Contact Pacific Mold Pros at (805) 232-3475 today to schedule a comprehensive inspection and take the definitive step toward a safe, healthy, and dry home.