Finding water under your house can send a jolt of panic through any homeowner, but what you do in the first few hours is critical. The absolute first priority is always safety. Once you’ve made sure the area is safe to enter, the next move is getting rid of any standing water and getting air moving to start the drying process.
Your First Moves to Tackle a Wet Crawl Space
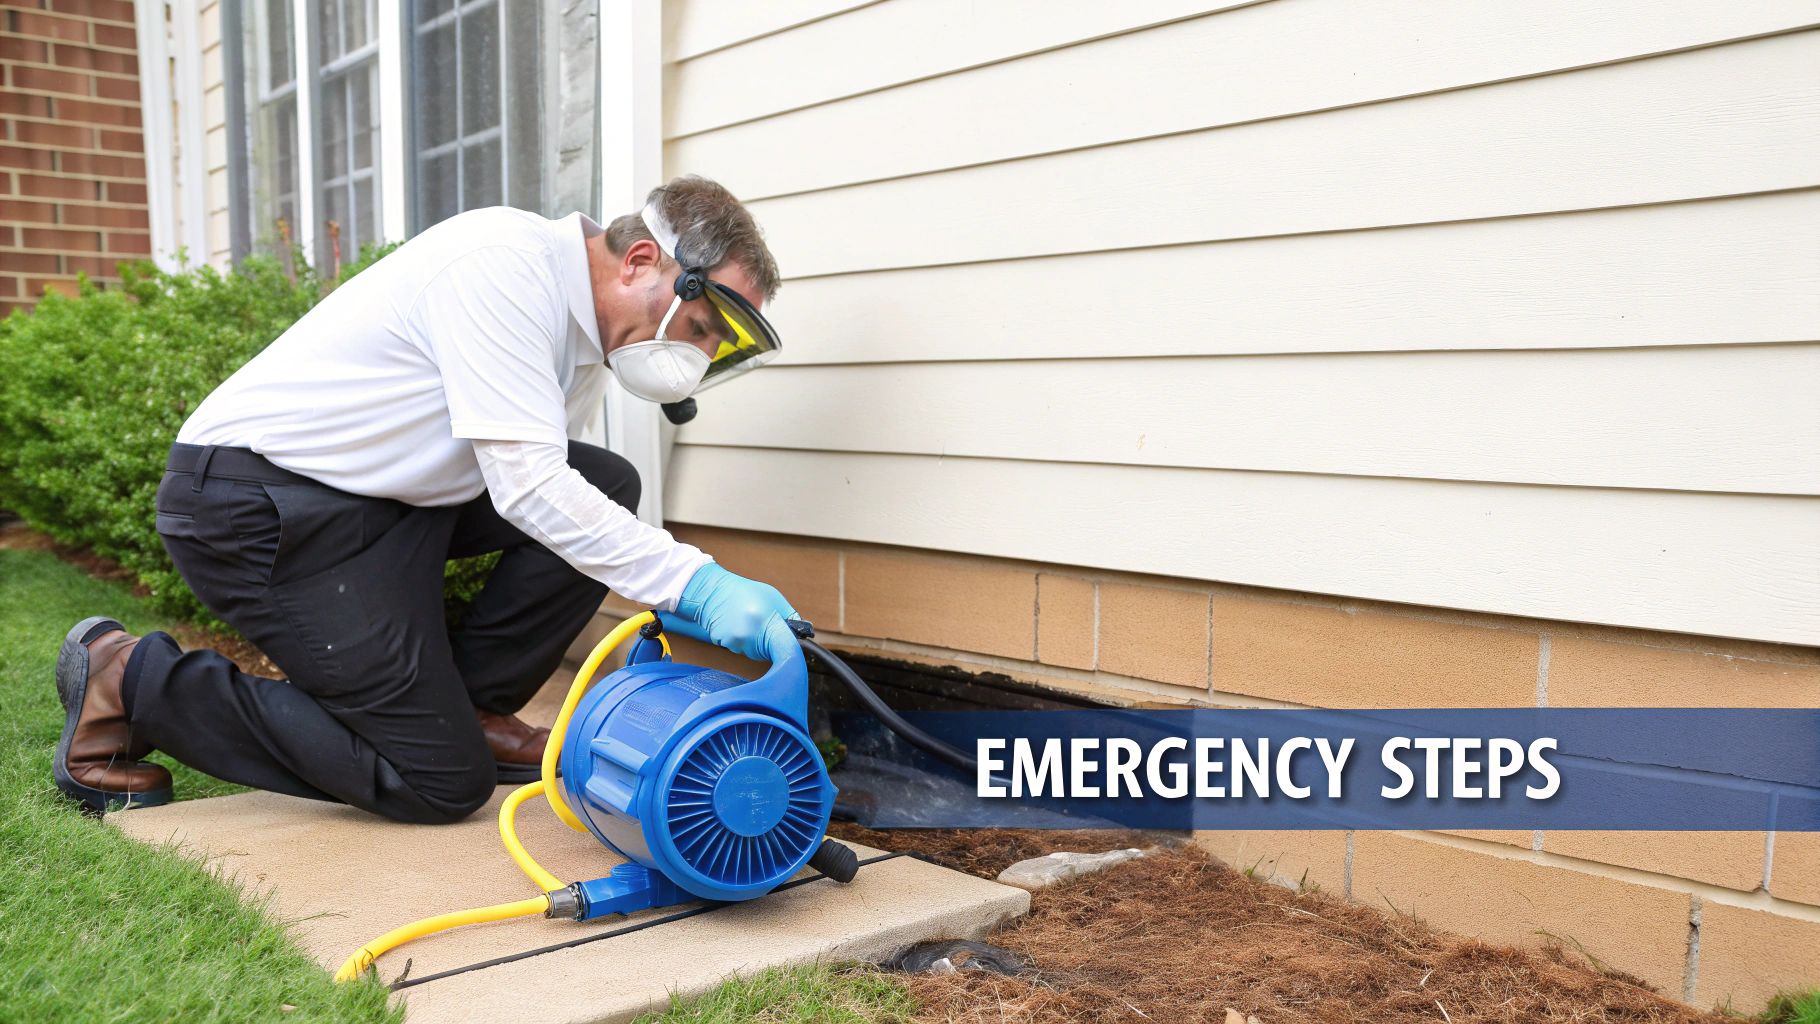
Discovering water pooling beneath your home is a clear signal to act quickly and deliberately. These initial steps won't fix the root cause, but they're the essential first aid that keeps a bad situation from spiraling into a disaster. Think of it as emergency triage—your goal is to stabilize the environment and stop the moisture from spreading further.
When you first find water, it's easy to get overwhelmed. This quick-reference table breaks down the most critical first steps to get the situation under control safely.
| Immediate Actions for a Wet Crawl Space | ||
|---|---|---|
| Action Item | Why It's Critical | Essential Tools |
| Shut Off Power | Prevents the lethal risk of electrocution from submerged wiring or outlets. | Breaker Panel |
| Gear Up (PPE) | Protects you from contaminated water, bacteria, mold spores, and hidden hazards. | Waterproof Boots, Gloves, N95 Respirator, Goggles |
| Remove Standing Water | Stops water from soaking deeper into wood and insulation, which leads to rot and mold. | Wet-Dry Vacuum (Shop Vac), Mop/Bucket |
| Start Airflow | Begins the evaporation process, helping to dry out damp surfaces and prevent mold growth. | High-velocity Fans, Air Movers |
These actions form the foundation of your immediate response, buying you valuable time to assess the full extent of the problem without risking your health or your home's structure.
Prioritize Safety Above All Else
Before you even begin to think about how to dry out the crawl space, you have to deal with the immediate dangers. Standing water plus live electricity is a deadly mix.
First things first, cut the power. Head to your main breaker panel and flip the switch for any circuits running to the crawl space. This covers outlets, lights, and any submerged equipment like sump pumps. Don't take any chances.
Next, gear up. Entering a wet, enclosed space without the right Personal Protective Equipment (PPE) is a huge mistake. This isn't just a suggestion; it's a must-do for your own safety.
Your basic PPE kit should include:
- Waterproof Boots: Good rubber boots are non-negotiable. They protect you from contaminated water and reduce electrical risks.
- Gloves: Get some heavy-duty, waterproof gloves to shield your hands from bacteria, pests, or sharp debris you can't see in the water.
- Respirator Mask: A damp, dark space is a perfect breeding ground for mold. An N95-rated respirator is the bare minimum to keep from breathing in airborne spores and other nasty stuff.
- Safety Goggles: You need to protect your eyes from splashes of potentially contaminated water.
Triage the Water Situation
With all your safety precautions in place, it’s time to start getting the water out. The goal here is simple: remove any pooled water as fast as you can. The longer water sits, the more it soaks into your wooden joists, insulation, and foundation, causing long-term damage.
For a few small puddles, a mop and bucket might do the trick. But for anything more serious, a wet-dry vacuum (often called a shop vac) is your best friend. Start at the lowest points and work your way through the space, sucking up as much of the liquid as you can.
This initial water removal is a game-changer. Every minute that water sits increases the risk of wood rot, which can compromise the structural integrity of your home and create the perfect environment for a major mold problem. If you're already seeing signs of a previous leak, knowing how to check for mold after water damage is your critical next step.
Key Takeaway: After ensuring the area is safe, getting the standing water out is your top priority. This one action drastically cuts the risk of long-term structural damage and widespread mold, giving you the breathing room you need to figure out what to do next.
Finding the Source of Your Crawl Space Moisture
Alright, you've dealt with the immediate mess. Now for the real work. Just drying out the water is like putting a band-aid on a broken arm—it doesn't fix the actual problem. To truly solve your moisture issue for good, you need to put on your detective hat and trace that water back to its source.
This investigation is easily the most critical part of the process. If you skip this, you'll find yourself stuck in a frustrating loop of drying and re-drying the same space over and over. Almost every time, the issue boils down to one of three things: groundwater, plumbing leaks, or condensation from high humidity.
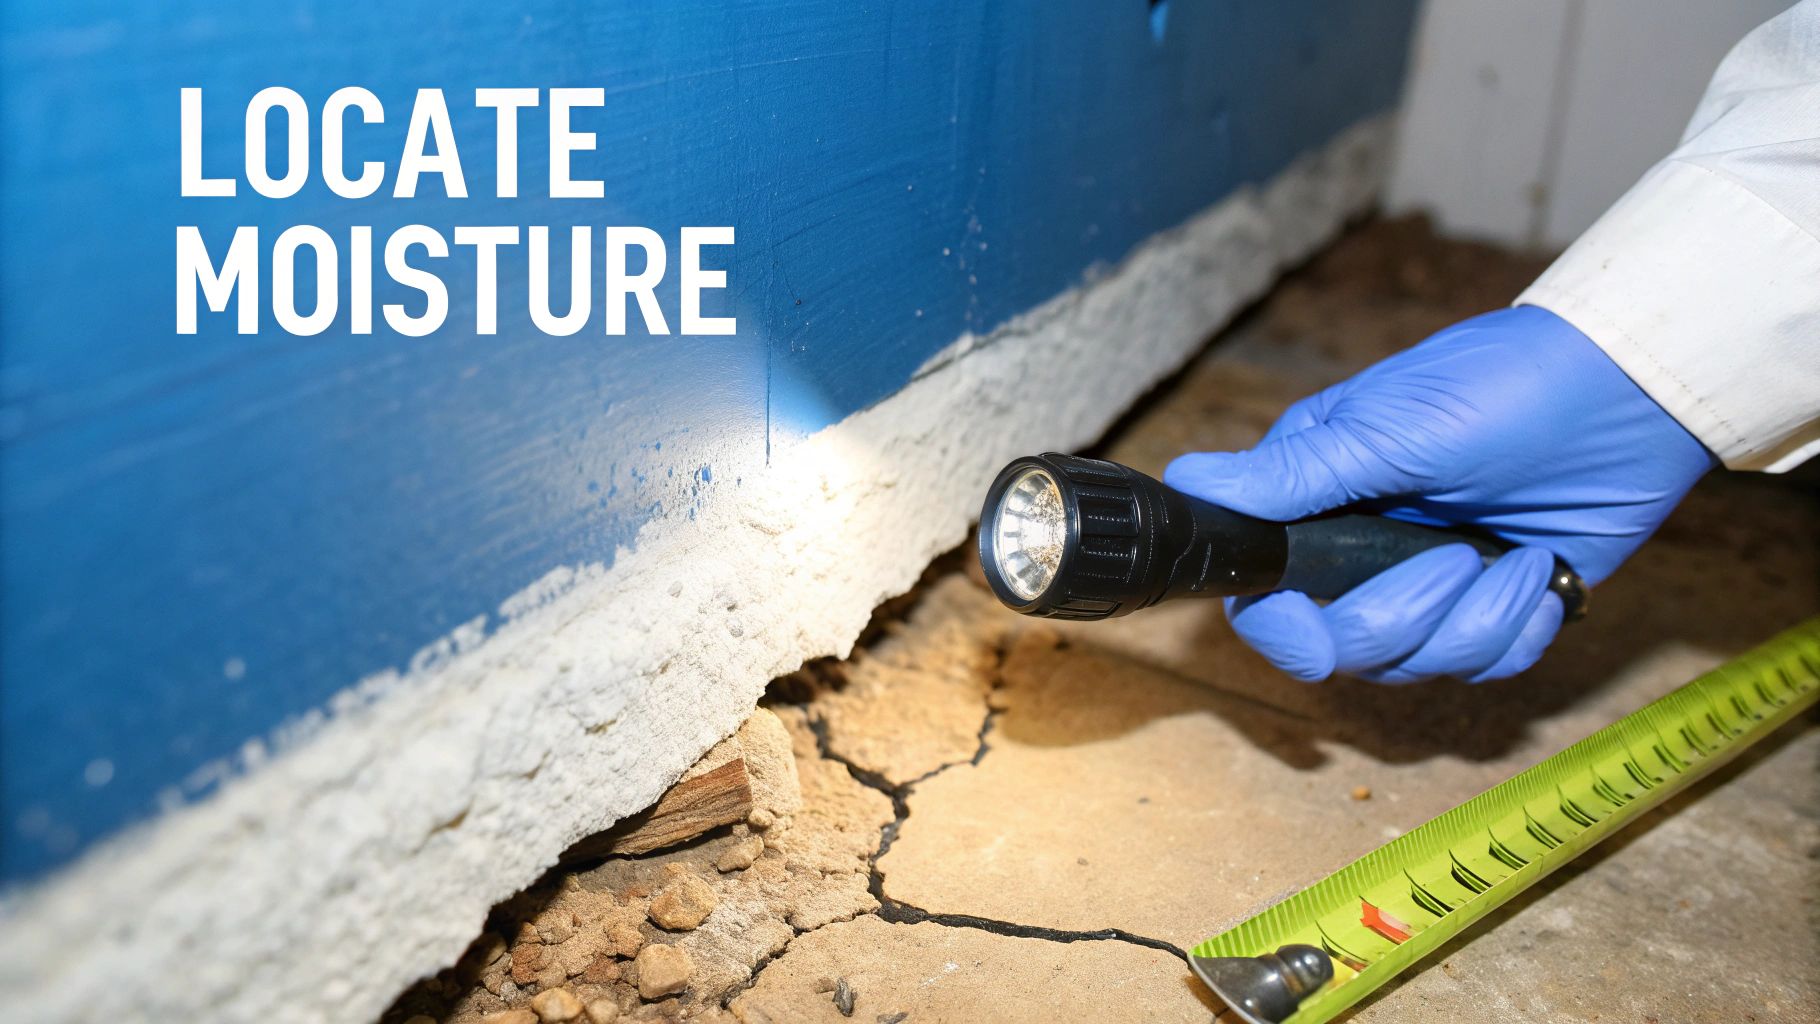
Searching for Common Culprits
Start by looking for the obvious stuff. Grab a good, powerful flashlight and methodically scan every single inch of your crawl space. Pay extra close attention to the perimeter where the foundation walls meet the ground, and follow any pipes or utility lines that run through the area.
Your main suspects usually fall into a few categories:
- Plumbing Leaks: These are often the easiest to spot. Look for dripping pipes, water stains on the wood joists directly under a kitchen or bathroom, and any puddles near your water heater or main supply lines. A slow drip might not seem like a big deal, but it adds up fast.
- Foundation Cracks: Carefully inspect your foundation walls for any cracks. Vertical or stair-step cracks in cinder block walls are classic entry points for water. When it rains hard, hydrostatic pressure can literally force water right through these weak spots.
- Groundwater Seepage: Is the ground just… damp? If you see moisture along the base of the foundation walls or it seems to be coming up from the dirt floor itself, groundwater is probably your offender. This is especially common if you live in an area with a high water table or after a big storm.
This first pass will often point you right to the problem. A leaky pipe fitting is a pretty straightforward fix. But if you're seeing widespread dampness, it's time to dig a little deeper into your home's exterior drainage and the crawl space environment itself.
Distinguishing Between Water Sources
Sometimes, the source isn't so clear. Is that water beading up on your pipes from a tiny leak, or is it just condensation? Is the damp soil from seepage or from humid air settling? You have to figure this out to apply the right fix.
Here’s a simple but surprisingly effective trick: the plastic sheet test. Tape a one-foot square of clear plastic sheeting flat against a concrete foundation wall and another one flat on the dirt floor. Leave them for 24-48 hours, then check them out.
- Moisture on the underside of the plastic (the side touching the wall or ground) means water is seeping through from the outside. That points to groundwater or drainage issues.
- Moisture on the top of the plastic (the side facing the crawl space air) tells you the air inside the crawl space is too humid and causing condensation.
This little test helps you narrow your focus in a big way. Seepage means you need to look at exterior solutions like improving your yard's grading or installing French drains. Condensation, on the other hand, points to an internal problem that needs better ventilation, a good dehumidifier, or even full encapsulation. These complexities are why it's so important to understand the common moisture problems in a crawl space before you start throwing money at solutions.
Expert Insight: It surprises a lot of homeowners, but those crawl space vents can actually cause moisture problems, especially in humid climates. The idea was to "air out" the space, but they often just pull in warm, moist air that immediately condenses on cooler surfaces like pipes and foundation walls.
The Role of Vented Crawl Spaces in Moisture Issues
For decades, building codes required crawl spaces to be vented. We know better now. Modern building science has shown this design often creates more issues than it solves, which is why so many homeowners are now dealing with the consequences.
Research from Building America found that roughly 20% of new homes in the U.S. are still built with vented crawl spaces. In one study, a staggering 62% of these crawl spaces had visible mold growth, and 31% had active plumbing leaks. Those numbers show just how quickly a "standard" design can become a serious problem. You can see more insights from the full Building America research on this topic.
By meticulously tracking down the source—whether it’s a leaky pipe, a cracked foundation, or humid air pouring through the vents—you stop being reactive and start being proactive. This diagnosis is the foundation for everything that comes next, ensuring your drying efforts lead to a permanent fix, not a temporary one.
Your Game Plan for Drying Out the Crawl Space
Alright, you've stopped the leak and pumped out the standing water. You've gone from crisis mode to the main event: getting every last drop of moisture out of the bones of your house. This isn't a "wait and see" situation. Drying out structural materials requires an aggressive, strategic approach with the right gear.
Think of it this way: you need to create a powerful drying vortex down there. Your goal is to get dry, moving air to constantly circulate, pull moisture from the wood and concrete, and then get that damp air out. This is a methodical process, not guesswork.
Deploying Your Drying Arsenal
The one-two punch for this job comes from two key pieces of equipment: high-velocity air movers (you might know them as carpet fans) and commercial-grade dehumidifiers. Using one without the other is like trying to row a boat with a single oar—you'll get nowhere fast. They have to work in tandem.
First, the air movers. Their job isn't to remove moisture but to get it moving. By blasting air across damp surfaces like floor joists and subflooring, they dramatically speed up evaporation. This process pulls the "bound water" trapped deep inside the wood and pushes it into the air as vapor.
That’s where the dehumidifier takes over. A high-capacity dehumidifier is the collection point for all that airborne moisture. It sucks in the damp air, condenses the vapor back into liquid water, and drains it away. This leaves behind dry air, which the fans then push back across the wet surfaces, continuing the cycle.
For this to work, placement is everything:
- Create a circular airflow. Position your air movers to create a continuous, swirling loop of air around the entire crawl space.
- Aim at the wet spots. Point the fans directly at the wettest surfaces—the subfloor, joists, and foundation walls need the most attention.
- Place the dehumidifier in the middle. This allows it to efficiently draw in moist air from all directions. Make sure its drain hose runs to a sump pit or outside where it can drain properly.
Choosing the Right Equipment
Let's be clear: the little dehumidifier from your basement probably isn't going to cut it here. A saturated crawl space needs heavy-duty equipment.
Look for a commercial-grade LGR (Low-Grain Refrigerant) dehumidifier. These machines are beasts, designed to pull massive amounts of water from the air, even in the cool temperatures typical of a crawl space. While a standard home unit might remove 30-50 pints of water per day, a good LGR can pull over 100 pints. You can usually find these at local tool rental shops.
For air movers, more is better. A good rule of thumb is to use at least one air mover for every 200-300 square feet of crawl space to keep the air churning.
To help you decide on the best strategy for your situation, here's a quick comparison of the common methods people use to dry out a crawl space.
Crawl Space Drying Methods Compared
| Method | Best For | Pros | Cons |
|---|---|---|---|
| Natural Ventilation (Passive) | Very minor dampness; low humidity climates. | No cost; no equipment needed. | Extremely slow; ineffective for significant moisture; won't prevent mold. |
| Box Fans & Home Dehumidifier | Small, contained areas with light moisture. | Low cost; uses existing equipment. | Often underpowered; slow drying time; not effective for saturated wood. |
| Professional Air Movers & LGR Dehumidifier | Significant water intrusion, flooding, or saturated materials. | Fastest and most effective method; prevents mold growth; addresses deep moisture. | Higher cost (rental or professional service); requires proper setup. |
| Encapsulation with Conditioning | Long-term moisture control and prevention after initial drying. | Creates a permanently dry, clean space; improves air quality; energy efficient. | High upfront investment; requires professional installation. |
While natural methods seem appealing, relying on professional-grade equipment after a water event is almost always the right call to prevent much bigger problems down the line.
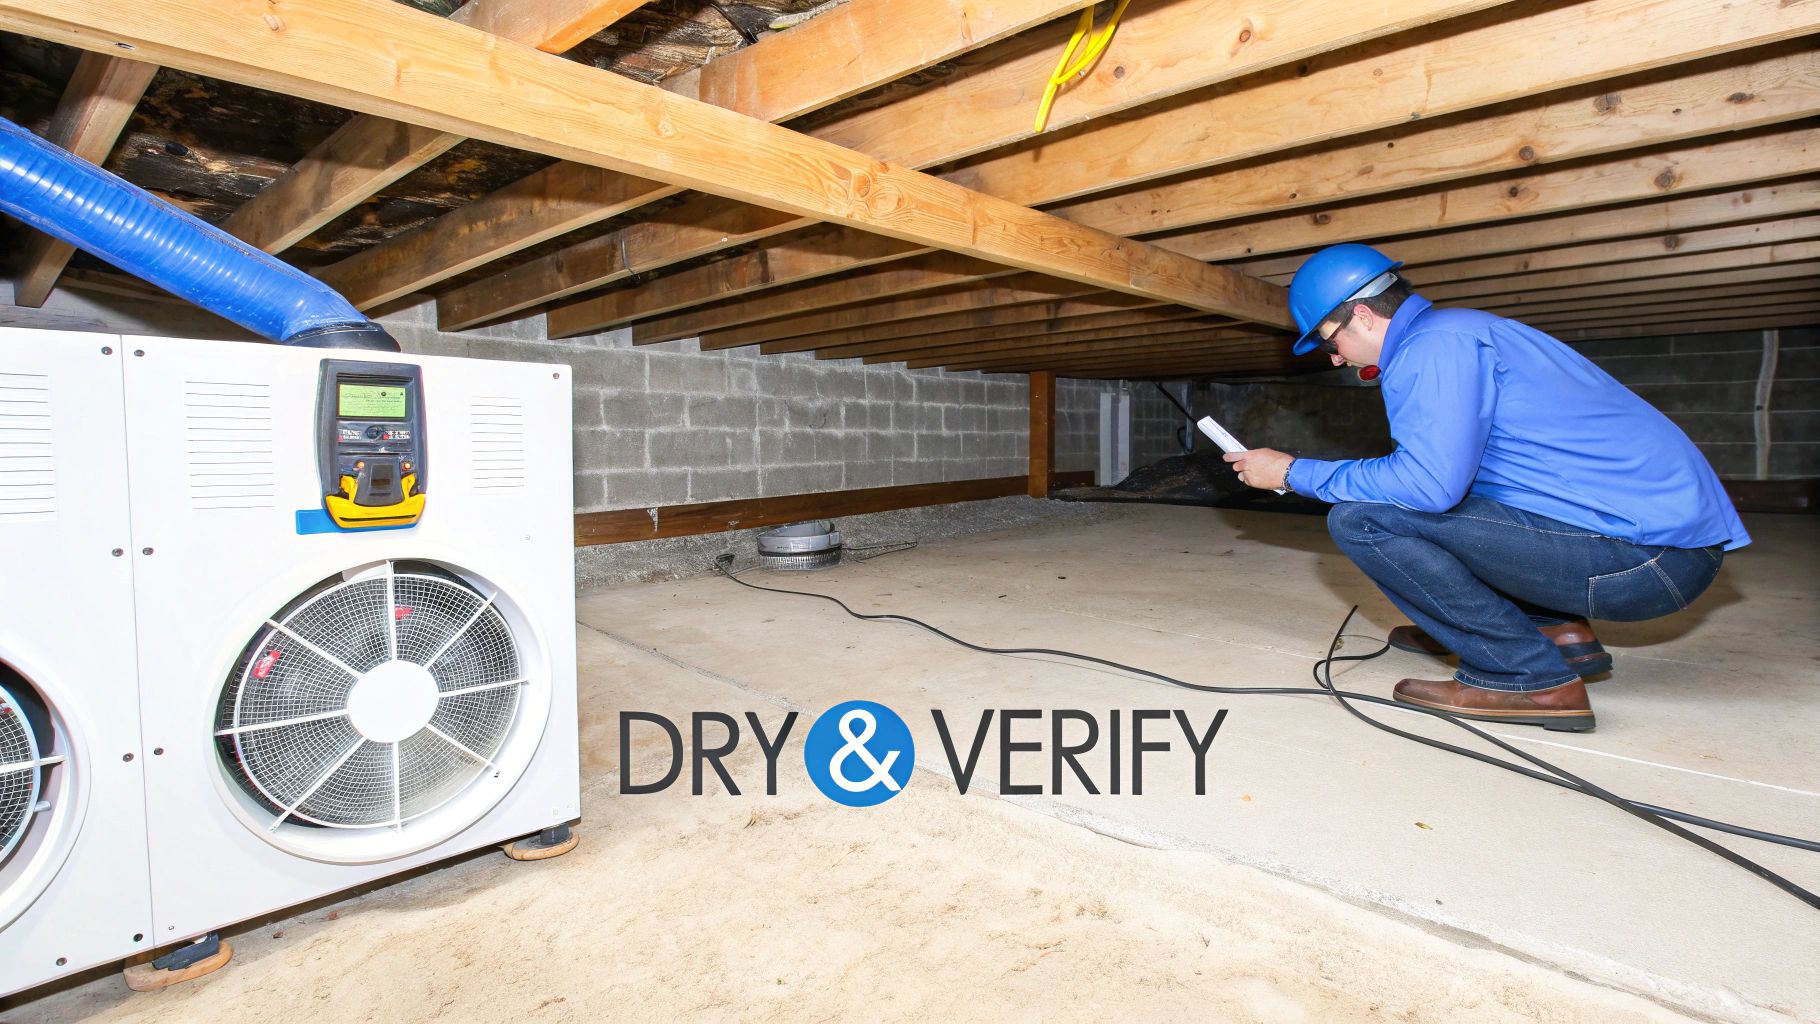
Knowing When the Job Is Truly Done
So, how do you know when it’s actually dry? Don’t trust your eyes or hands. Wood can feel dry to the touch while still harboring enough moisture inside to grow mold and begin to rot.
The only way to be certain is with a moisture meter.
This simple handheld device gives you a hard number, taking all the guesswork out of the equation. Just press its probes into the wood joists, beams, and subflooring to get a moisture content percentage.
The Gold Standard for Dryness: Your goal is to get all wood materials to a moisture content of 19% or less. Any reading above this level is an open invitation for mold and rot.
Take readings from multiple spots throughout the crawl space every 24 hours and log them. You should see the numbers consistently drop. The job is officially done only when every single piece of structural wood is verifiably below that critical 19% threshold. This final step is what separates a temporary fix from a true, lasting solution.
Building Your Defense Against Future Moisture
Getting your crawl space dry is a huge victory, but let’s be honest—it’s only half the battle. The real goal is making sure you never have to do it again. This is where you shift from reactive drying to proactive prevention, building a robust defense system that keeps moisture out for good.
This isn’t about a single magic bullet. A lasting solution means creating multiple layers of protection, both inside and outside your home. It’s about taking control of your home's entire moisture ecosystem, from the dirt under the house to the rain falling on the roof.
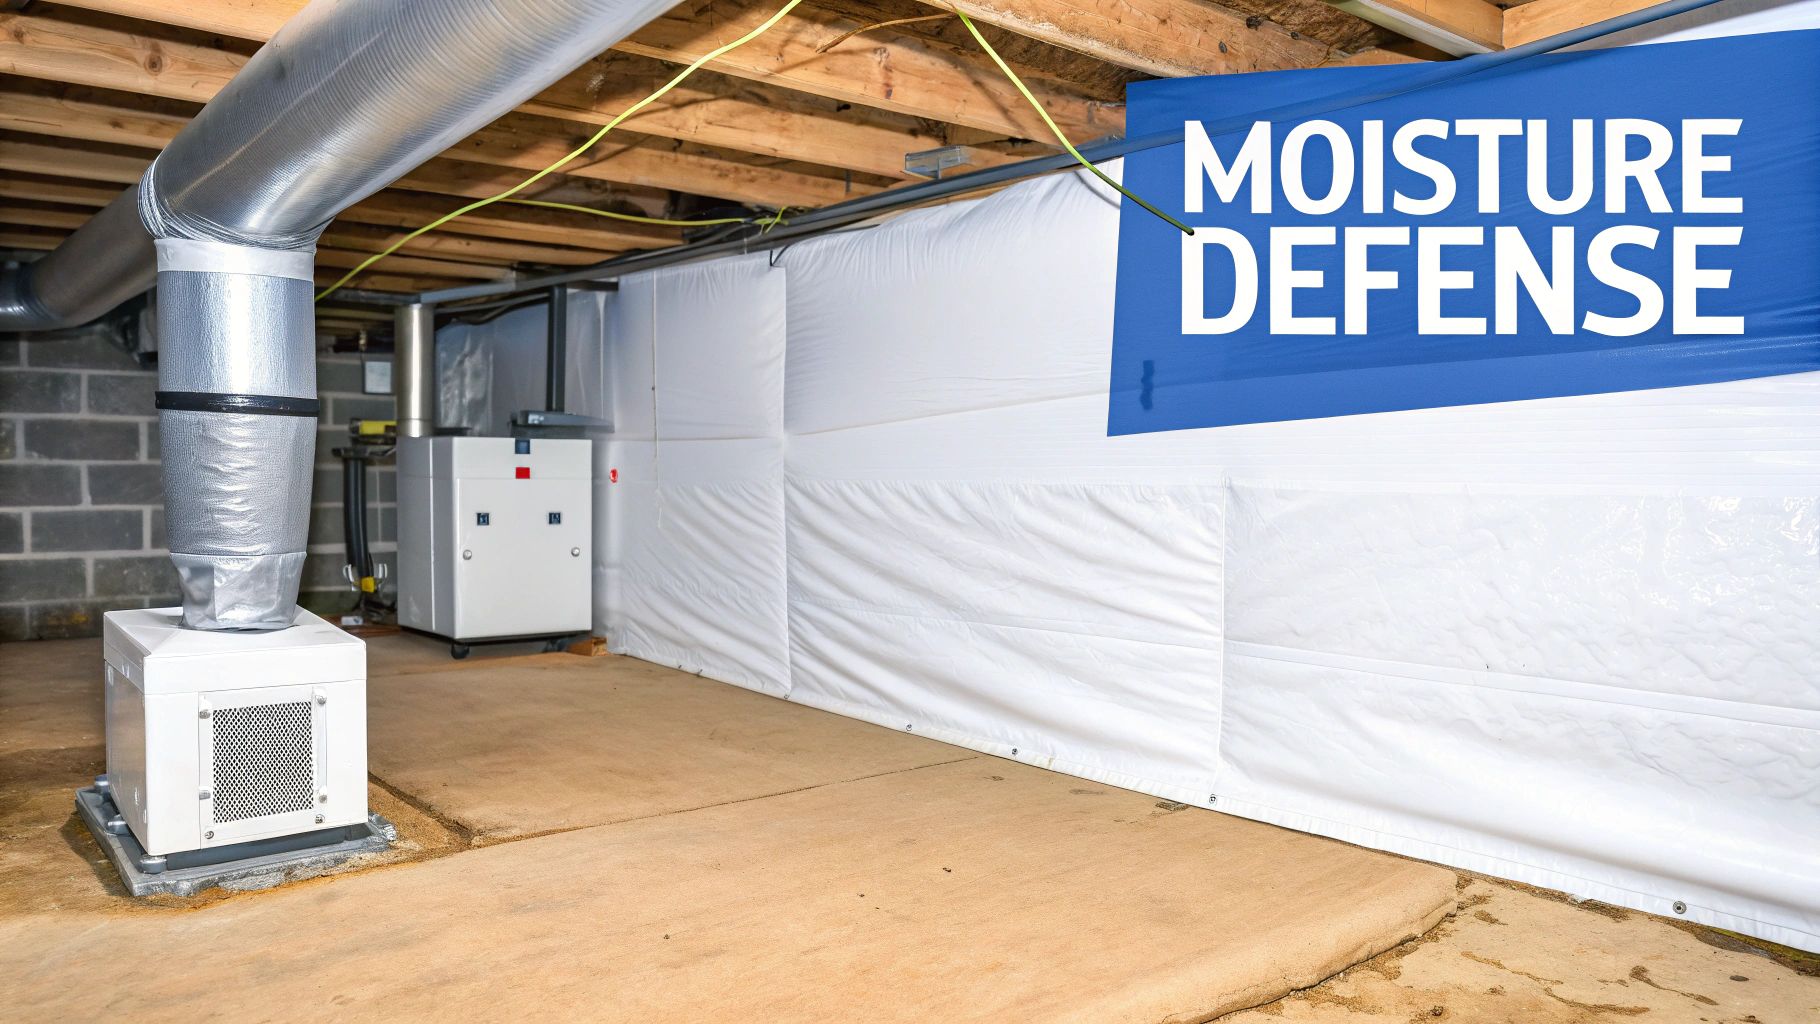
The Ultimate Interior Defense: Crawl Space Encapsulation
By far, the most effective strategy for long-term moisture control is crawl space encapsulation. This process completely transforms your damp, dirty crawl space into a clean, dry, and conditioned part of your home by isolating it from the ground and outside air.
Encapsulation isn't just one step; it's a system of components working together:
- Installing a Vapor Barrier: This is the heart of the system. A thick, durable plastic liner—think 10-20 mil thick—is laid across the entire dirt floor. Seams are overlapped and sealed with special waterproof tape to create a single, continuous sheet.
- Sealing the Walls: The vapor barrier runs right up the foundation walls, where it's mechanically fastened and sealed. This creates an impenetrable shield against moisture evaporating from the ground and concrete.
- Closing Off Vents: Those old foundation vents are permanently sealed. This is critical. It stops humid summer air and cold winter drafts from getting in, which are major sources of condensation.
- Insulating the Walls: Instead of insulating the floor joists above, we install rigid foam insulation directly on the foundation walls. This helps regulate the temperature within the newly sealed space, making it part of your home’s conditioned envelope.
Once encapsulated, the crawl space becomes a controlled environment. The final, critical piece is adding a permanent, commercial-grade dehumidifier to maintain the relative humidity around a steady 50%. This system actively prevents the conditions that allow mold to even think about growing.
If you're considering a permanent fix, exploring professional crawl space moisture control services will give you a clear roadmap for your specific home.
Hardening Your Home's Exterior Perimeter
What happens outside your home has a direct impact on what happens underneath it. No interior system can win a fight against a constant flow of water from the outside. You have to address drainage at the source.
Start by looking up. Clogged gutters are one of the biggest culprits behind foundation moisture. When they overflow, they dump thousands of gallons of water right at the base of your house.
- Gutters and Downspouts: Clean your gutters at least twice a year, especially in the fall. More importantly, make sure your downspouts extend at least six to ten feet away from your foundation, discharging water where it can drain away harmlessly.
- Landscape Grading: The ground around your home should slope away from the foundation. You need a drop of at least six inches over the first ten feet. If the ground is flat or, worse, slopes inward, water will pool against your walls and inevitably find a way in.
Pro Tip: For minor grading issues, creating a "swale"—a shallow, wide trench—can work wonders to redirect surface water. For more serious groundwater problems, an exterior French drain system is the ultimate solution, collecting water before it even has a chance to reach your foundation.
Creating a Truly Controlled Environment
With the interior sealed and the exterior managed, the final piece is active climate control. A permanently installed dehumidifier acts as the guardian of your crawl space, constantly monitoring and adjusting humidity levels without you lifting a finger.
This isn't your average portable unit. A professional system is tied into your home's electrical panel and includes a drain line that automatically pumps out the collected water. It requires minimal maintenance and ensures that even on the most humid days, the air in your crawl space remains too dry for mold to take hold.
By combining encapsulation, smart exterior water management, and active climate control, you create a multi-layered defense that protects your home's structure and your family's health for years to come.
How a Damp Crawl Space Impacts Your Family's Health
It’s easy to think, "out of sight, out of mind" when it comes to your crawl space. Most people rarely go down there. But that mindset is a dangerous one, because what’s happening below your floors has a direct, significant impact on the air your family breathes every single day.
What happens in your crawl space doesn't stay in your crawl space.
There’s a natural process in every home called the stack effect. Think of your house as a giant chimney. As the warmer air in your living space rises and escapes through the attic and upper levels, it creates a subtle vacuum. This vacuum pulls replacement air up from the lowest point of your home—you guessed it, the crawl space.
This means a huge chunk of the air you’re breathing upstairs started out down below.
The Unseen Contaminants in Your Air
When your crawl space is damp, it becomes the perfect breeding ground for a whole host of nasty things. Mold, mildew, bacteria, and dust mites all flourish in these dark, moist environments. As the stack effect does its job, it pulls microscopic mold spores, musty odors, and other allergens right up into your living room, kitchen, and bedrooms.
This isn't just a small problem; it's a major source of indoor air pollution. Studies show that roughly 40% of the air in the first floor of a home originates from the crawl space. If that crawl space has moisture problems, you’ve basically created a pipeline delivering a steady stream of contaminants throughout your house. You can learn more about this connection in this scary crawlspace journal article.
The Connection Is Clear: A wet crawl space directly translates to poor indoor air quality. Fixing the moisture issue below your home is one of the most effective steps you can take to create a healthier living environment for your family.
This contaminated air can be especially harmful to certain people, triggering a whole range of health issues that might otherwise seem completely random.
Who Is Most at Risk?
While poor air quality is bad for everyone, some family members are far more vulnerable to the effects of airborne mold and allergens. Constant exposure can make existing conditions worse or even create new sensitivities over time.
Those most susceptible to health problems from a damp crawl space include:
- Children and Infants: Their immune and respiratory systems are still developing, making them extra sensitive to contaminants like mold spores.
- The Elderly: A weaker immune system can make older adults more prone to respiratory infections and allergic reactions.
- Individuals with Asthma: Mold is a notorious asthma trigger. Constant exposure can lead to more frequent and much more severe attacks.
- People with Allergies: If someone in your house deals with persistent allergies, a moldy crawl space could be the hidden reason their symptoms never seem to go away.
- Anyone with a Compromised Immune System: For those with weakened immunity, certain types of mold can lead to very serious infections.
Understanding the specific health risks of mold exposure is critical. The symptoms can be as mild as sneezing, coughing, and itchy eyes, or as severe as shortness of breath and chronic fatigue.
Ultimately, learning how to dry out a crawl space is about more than just home maintenance. It’s a proactive step to protect the health of everyone inside. By getting rid of the moisture, you cut off the supply of contaminants at the source, ensuring the air circulating through your home is clean, safe, and healthy.
Knowing When to Call a Professional
Trying to dry out a crawl space yourself is a solid DIY effort, but there are definitely times when you need to call for backup. Knowing when to put down the shop vac and pick up the phone isn’t a sign of defeat—it’s a smart move to protect your home from a problem that can get out of hand, fast.
Some situations just demand a higher level of expertise and equipment. If you’ve run fans and dehumidifiers for days but that persistent musty odor won’t go away (or it comes right back), that’s a huge red flag. It usually means moisture is hiding where you can't see it, and you need a pro’s tools to hunt it down.
Red Flags That Demand an Expert Eye
Certain discoveries in a damp crawl space should immediately switch your mindset from DIY to calling in an expert. These aren't minor hiccups; they are clear signs the problem is more serious than you thought.
Keep an eye out for these warning signs:
- Visible Mold Growth: If you find anything more than a few tiny, isolated spots of mold, stop what you're doing. Disturbing a significant mold colony without proper containment can blast spores throughout your entire house, turning a crawl space issue into a whole-home problem.
- Worsening Allergy Symptoms: Are family members suddenly sneezing, coughing, or dealing with nagging respiratory issues? It could be directly linked to poor air quality coming up from the crawl space. This is a clear signal that the problem is already impacting your living space.
- Spongy Wood or Warped Floors: Grab a screwdriver and firmly press it into a few of the wooden joists. If the wood feels soft, spongy, or gives way easily, you could be looking at wood rot. This isn't just a moisture problem; it's a direct threat to your home's structural integrity.
Key Insight: Calling an independent inspector isn't just about finding mold or water. It's about getting an unbiased, expert diagnosis of the root cause. A good inspector gives you a clear roadmap for remediation, ensuring you only pay for the work that’s actually needed to fix the problem correctly.
The Professional Toolkit and Process
Professionals don't just bring experience; they show up with specialized gear that gives them a much deeper look at what’s going on. They use tools like thermal imaging cameras to pinpoint hidden pockets of moisture trapped behind walls or deep within insulation—spots a standard moisture meter would completely miss.
They can also perform air quality tests to determine the specific types and concentrations of mold spores floating around. This scientific approach takes all the guesswork out of the equation, giving you a precise understanding of any potential health risks. A certified inspector can provide a detailed assessment of your situation, which is why we recommend exploring professional mold inspection services when you run into these red flags.
At the end of the day, calling a professional ensures the problem isn’t just dried out—it’s solved for good. It delivers the peace of mind that the job was done right, protecting your property value and, most importantly, your family's health.