When you discover a burst pipe, a leaking roof, or a flooded basement, your mind races. It's a chaotic and stressful experience, but the actions you take right now are what will determine the outcome.
The key to preventing mold after water damage is to be aggressive from the moment you find the problem. You're in a race against the clock, because mold can start to colonize wet materials in just 24 to 48 hours. This initial window isn't just important—it's everything. It's what separates a manageable cleanup from a major health and structural nightmare.
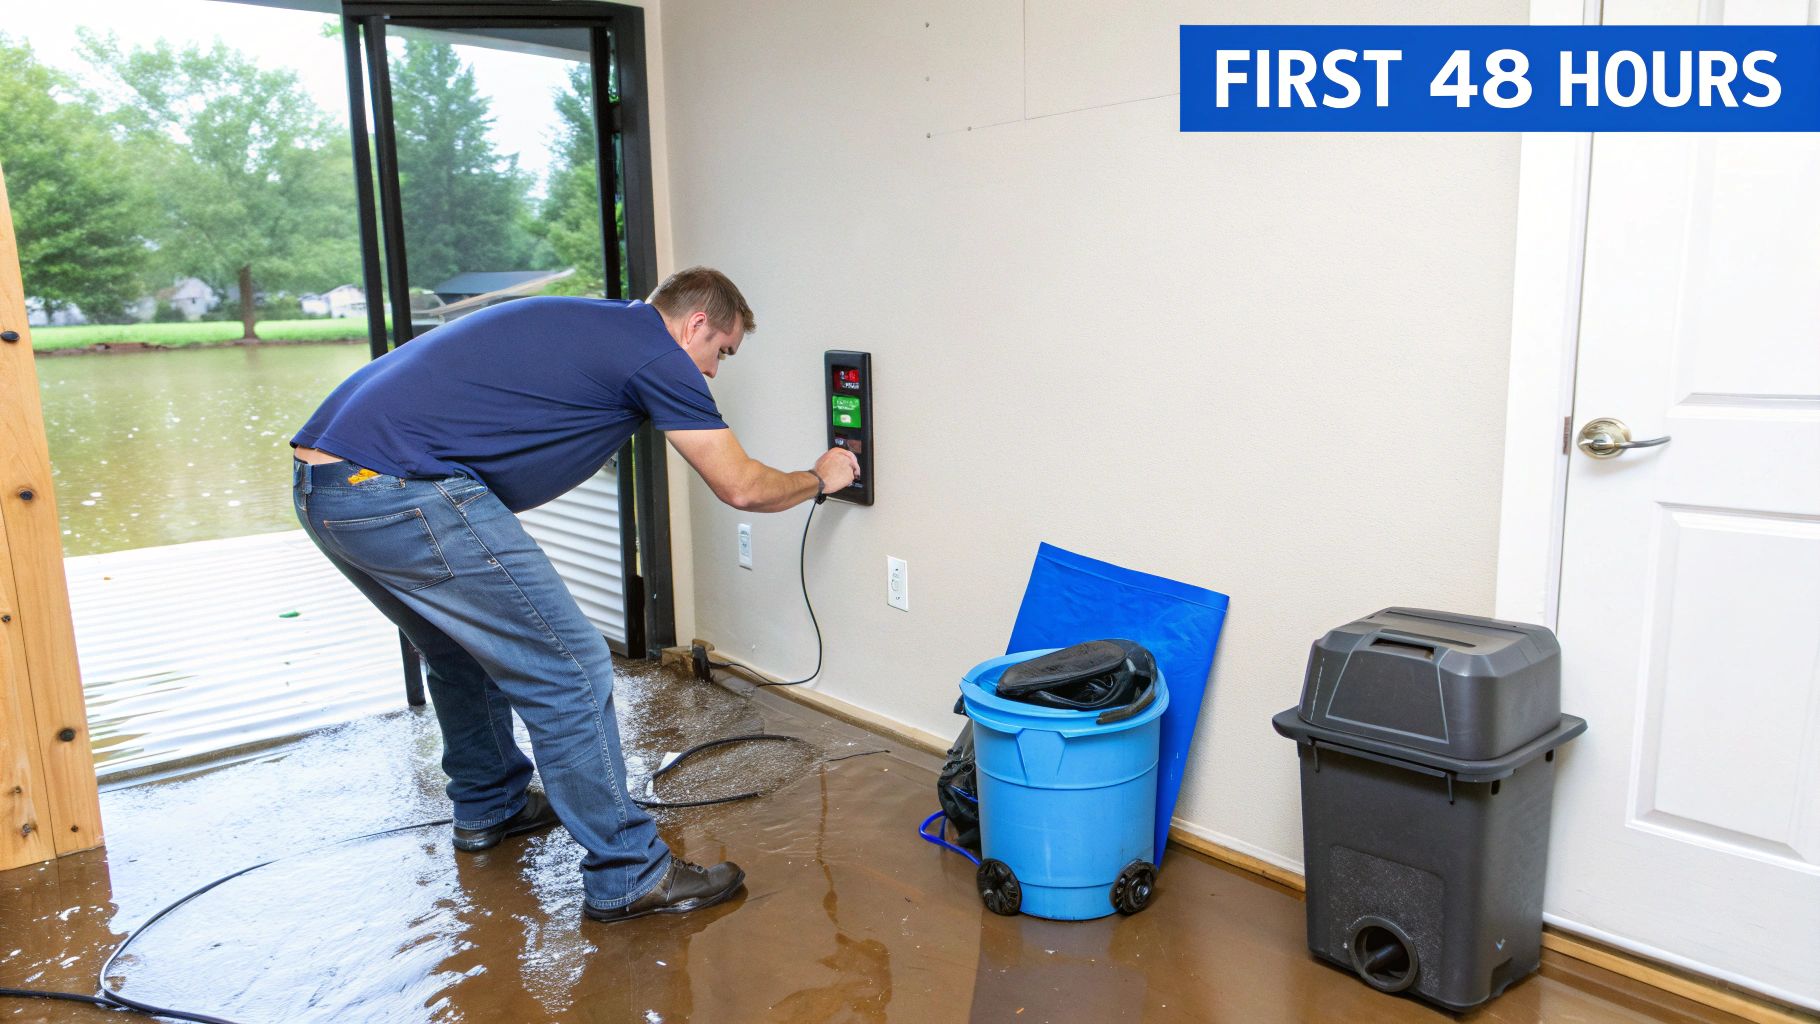
Your First 48 Hours After Water Damage
Mold spores are already in our environment, just waiting for the right conditions. Once materials get wet, it's go-time. Visible mold often appears within 24–72 hours, making your immediate response non-negotiable.
This is your emergency action plan. It's designed to cut through the noise and focus on what truly matters in these first critical hours. The goal isn't just to get rid of the water; it's to create an environment where mold simply cannot get a foothold.
To keep things simple during a stressful time, here's a quick checklist of the absolute must-dos.
Immediate Action Checklist (First 24 Hours)
| Action Item | Why It's Critical | Tools Needed |
|---|---|---|
| Ensure Safety | Prevents electrocution and structural collapse. Your safety is priority one. | Circuit breaker, flashlight |
| Stop the Water Source | Prevents the problem from getting bigger while you work. | Main water shutoff valve |
| Document Everything | Essential, non-negotiable proof for your insurance claim. | Smartphone (for photos/videos) |
| Begin Water Removal | Reduces saturation in materials, starving mold of its primary resource. | Wet/dry vacuum, buckets, mops |
Let's break these down into more detail.
Prioritize Safety Above All Else
Before you even think about cleanup, you have to make sure the area is safe. Water and electricity are a lethal combination.
-
Cut the Power: If you have any standing water, go straight to your home's breaker panel and shut off electricity to the affected area. If you're not sure which breaker to flip or if the panel itself is in a wet spot, just shut off the main breaker for the entire house. Never step in standing water if the power is on.
-
Identify Water Hazards: Think about where the water came from. Is it clean water from a supply line? Or is it potentially contaminated "greywater" from a dishwasher or, worse, "blackwater" from a sewage backup? Contaminated water is a serious health risk filled with bacteria and pathogens.
-
Check Structural Integrity: Look up. Do you see sagging ceilings or bulging drywall? Those are tell-tale signs that the materials are completely saturated and could collapse. Steer clear of these areas.
Stop the Water and Document Everything
Once you've confirmed it's safe to enter, your next two moves are to stop more water from coming in and to create a detailed record for your insurance company.
Pro Tip: Your smartphone is your most important tool at this stage. Before you move a single thing, take tons of photos and videos. Get every angle. Capture the source of the leak, the high-water marks on the walls, and close-ups of any damaged furniture or belongings. This documentation is your best friend when it comes to a smooth insurance claim.
After you've got your evidence, find the source of the water and shut it down. For a burst pipe, this usually means turning off your home’s main water valve. If an appliance is leaking, there's often a local shutoff valve right behind it. Cutting off the flow of water is a crucial step that allows you to shift from defense to offense.
Understanding how humidity fuels mold growth is key to the next steps. You can learn more about exactly at what humidity does mold grow in our detailed guide.
Begin Removing Standing Water
The final immediate task is getting as much of that standing water out as you can, as fast as you can. The longer your drywall, flooring, and furniture sit submerged, the more water they soak up, creating the perfect breeding ground for mold.
For smaller floods, a wet/dry shop vacuum is invaluable. If you're dealing with a lot of water, start by using buckets to bail out the bulk of it. If you have a sump pump or a floor drain, push the water in that direction. This initial water removal is a race against time, but with swift action, it's a race you can absolutely win.
Winning The Battle Against Hidden Moisture
Once you've removed all the standing water, it's easy to breathe a sigh of relief and think the worst is over. But from my experience, this is where the real work of preventing mold after water damage begins. The visible water is gone, sure, but its invisible counterpart—moisture—is now trapped deep inside your walls, under your floors, and hanging in the air.
This hidden moisture is exactly what dormant mold spores are waiting for. To win this battle, you have to get aggressive and turn your home into an environment where mold simply can't survive.
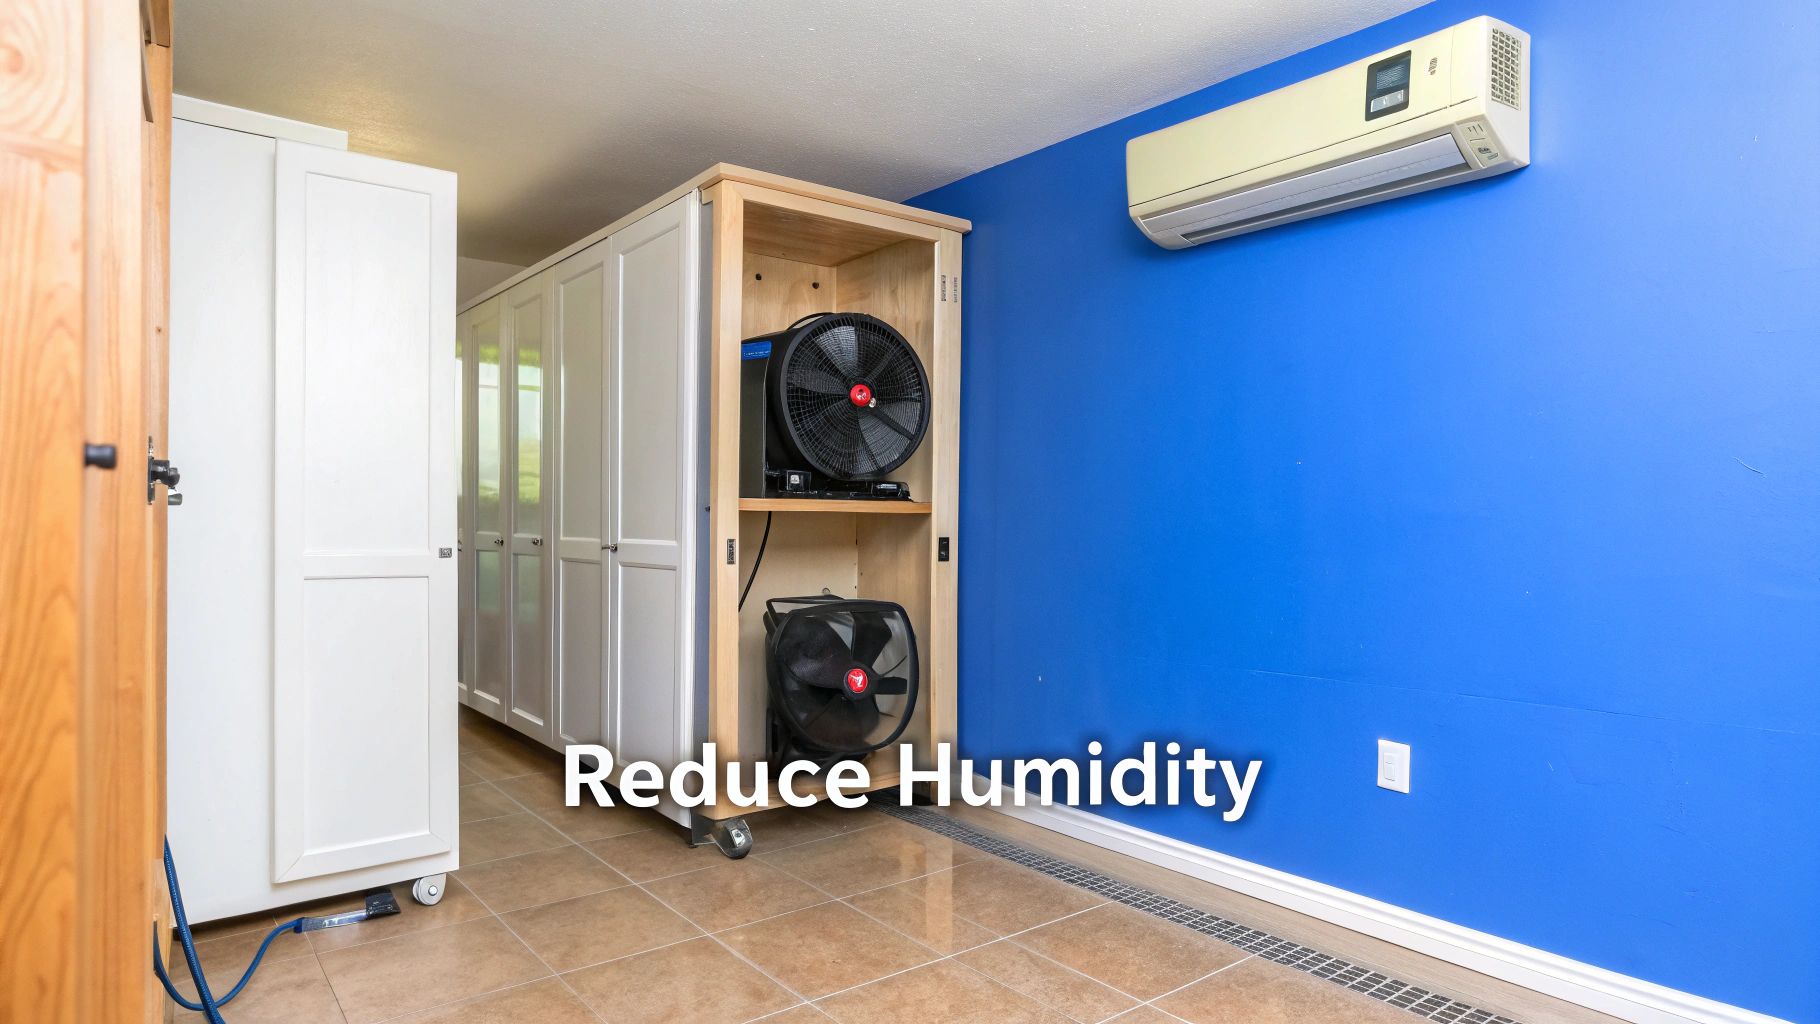
Creating A Powerful Drying Vortex
Your number one mission is to drop the relative humidity in your home, and fast. Mold loves to grow when humidity is above 60%, so your goal is to get it below 50% and keep it there. Don’t guess; grab a digital hygrometer from any hardware store. It’s an essential tool.
To hit that target, you need to create a powerful vortex of dry, moving air. This is more than just aiming a few fans at the wet spots. It’s a coordinated attack.
-
High-Velocity Fans: We call these "air movers" for a reason. They're designed to literally skim moisture off the surface of materials. You want to place them strategically to create a circular airflow, aiming them low along the base of the walls where water congregates.
-
Dehumidifiers: While the fans are busy kicking moisture into the air, the dehumidifier’s job is to yank it right back out. Place a good one in the middle of the affected area. You’ll be shocked at how quickly that collection tank fills up—empty it often so it can keep working.
Using these two tools together creates a powerful drying cycle. The fans evaporate, and the dehumidifier collects. It’s this constant motion that truly dries out a space.
Targeting Hidden Moisture Pockets
Moisture is sneaky. It seeps into every crack and crevice, so just drying the open areas is never enough. You have to actively hunt down those hidden damp spots. Think like water: Where would it flow? Where would it get trapped?
Real-World Scenario: We consulted on a job in Santa Barbara where a homeowner had a dishwasher leak. They thought they'd dried everything out. Weeks later, that telltale musty smell appeared. The problem? Moisture was trapped behind the kitchen cabinets and festering under the laminate flooring. The visible surfaces felt bone dry, but the hidden pockets had turned into a mold factory.
To avoid this nightmare, you need to expose those hidden areas:
-
Pull Off Baseboards and Trim: Baseboards act like tiny dams, trapping water at the very bottom of the drywall. Carefully pry them off to let air circulate right where it’s needed most.
-
Open Up Enclosed Spaces: Open every cabinet door and drawer, especially under sinks. A great pro tip is to pull out the toe-kicks from under your kitchen and bathroom cabinets. These dark, stagnant spaces are prime real estate for mold.
-
Address Saturated Materials: Drywall and wood studs are basically sponges. If your drywall is sagging, swollen, or feels soft, it's a lost cause. It has lost its integrity and needs to be cut out and removed, not just dried. This also has the benefit of exposing the wall cavity so you can dry the framing properly.
Verifying Complete Dryness
So, how do you know when everything is truly dry? You can't trust your hands. The surface might feel dry, but moisture can still be lurking deep inside the material.
This is where moisture meters come in. They’re what the pros use. These handheld devices have probes you can press right into drywall or wood to get a precise reading of the moisture content.
For an even deeper look, we use technology that can see what the naked eye can't. A thermal imaging house inspection is a game-changer for finding hidden moisture. This tech uses infrared to reveal tiny temperature differences in your walls, instantly showing you where water is still hiding without having to tear anything apart.
This final check is critical. It confirms your drying efforts were successful before you start putting things back together, ensuring you aren’t just sealing a future mold problem behind a fresh coat of paint.
Making The Tough Calls On What To Keep Or Toss
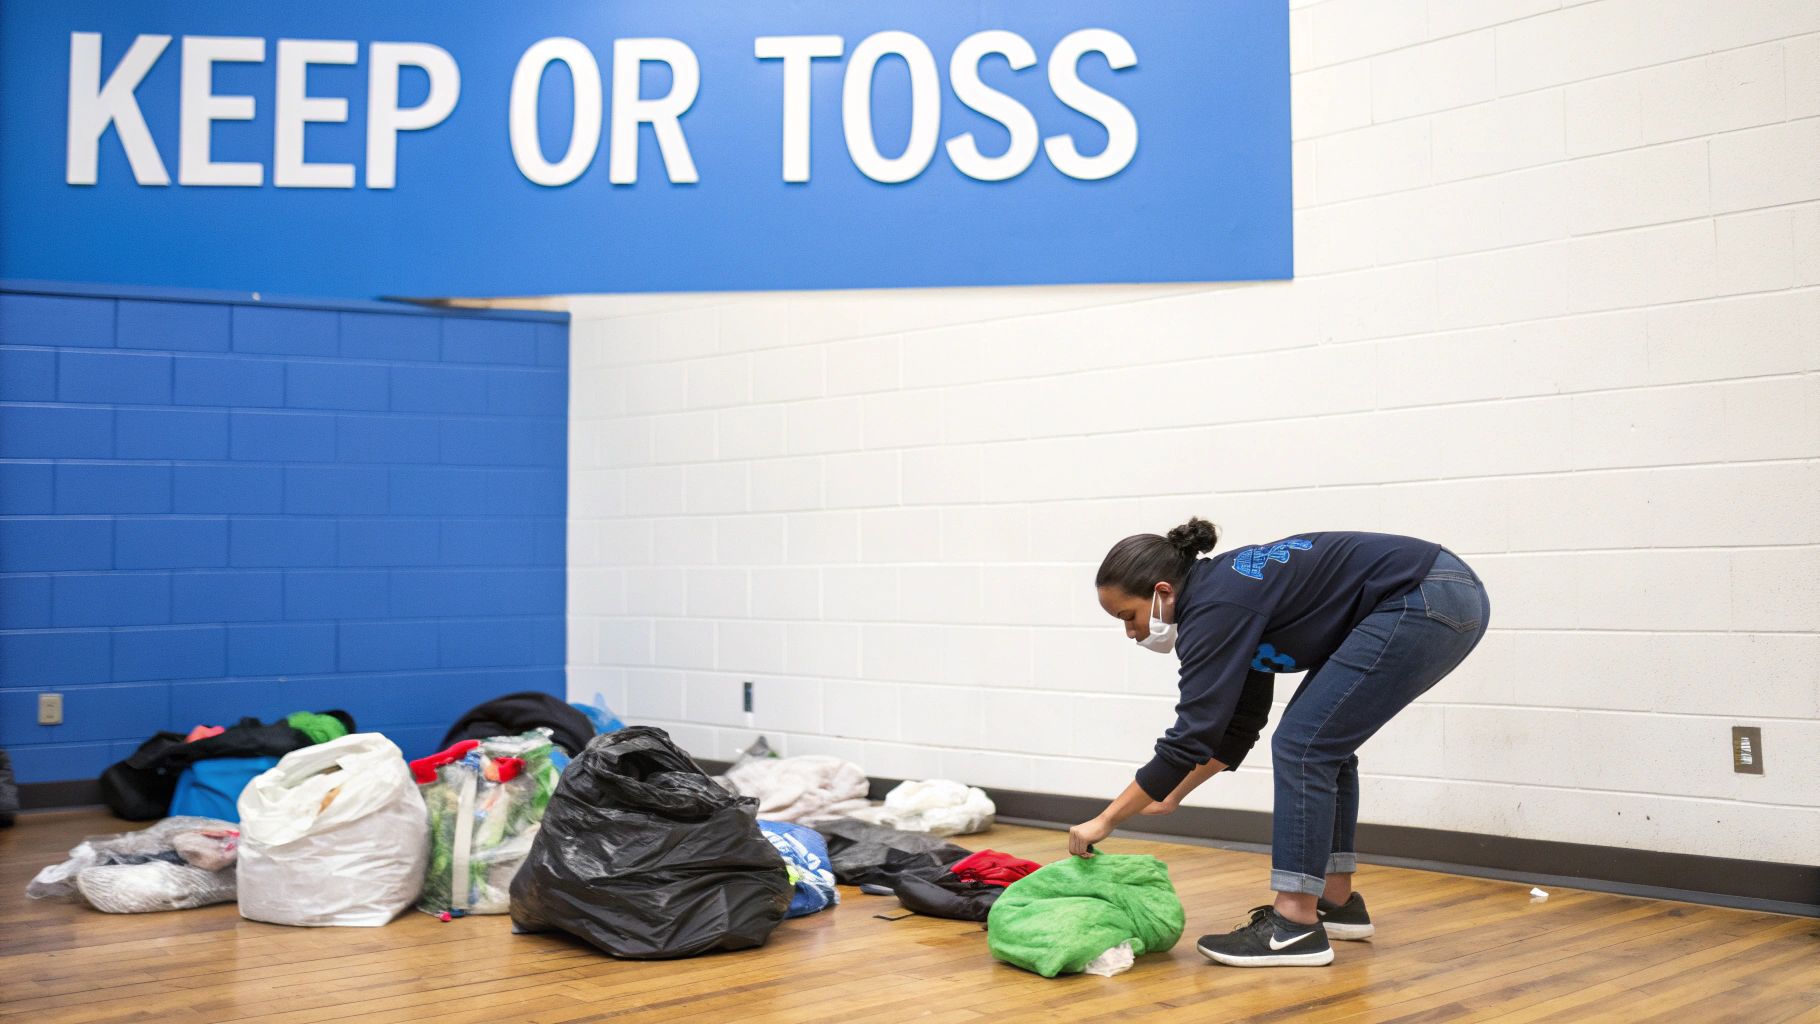
This is the part nobody likes. Sifting through your water-damaged belongings is an emotionally draining job. Every item holds a memory, but when you're working to prevent mold after water damage, you have to think with your head, not your heart.
Mold doesn’t care about sentimental value; it only cares about finding a damp place to grow. The best way to tackle this overwhelming task is to sort everything by how porous it is—basically, how easily it soaks up and holds onto water.
Non-Porous Items: The Easiest Saves
Let's start with the easy wins. Non-porous materials are things that water can't penetrate, making them straightforward to clean, sanitize, and get back into your life.
Think of items like:
- Glassware, dishes, and ceramics
- Metal tools and solid plastic containers
- Jewelry and hard, non-electronic toys
Cleaning these is simple. A good wash with soap and water, followed by a wipe-down with a disinfectant, will usually take care of any surface mold spores. Just make sure they are bone-dry before you store them away.
Semi-Porous Materials: Worth The Effort
This is the gray area where you'll spend most of your time and energy. Semi-porous items absorb some water, but with quick, aggressive action, they can often be salvaged.
We're talking about things like solid wood furniture, certain fabrics, and even the wooden studs inside your walls. A solid oak dresser or a hardwood dining table can often be saved if it hasn't been sitting in water for days. The dense wood grain offers some resistance, though the finish might need some work.
Expert Insight: Saving semi-porous items is all about speed and intense, targeted drying. For a piece of furniture, that means taking out every drawer, opening every door, and blasting it with high-velocity fans from every angle. This isn't a job for a few hours—it's a commitment of several days, but it often pays off.
Textiles aren't always a lost cause, either. While delicate fabrics may not survive, many clothes can be rescued. If you're dealing with musty laundry, there's a specific cleaning process to follow. Knowing the right way to handle mold on clothes in your closet can make the difference between saving a favorite outfit and throwing it away.
Highly Porous Items: Too Risky To Keep
This is the toughest category, emotionally and practically. Highly porous materials act like giant sponges, wicking water deep into their fibers where it becomes nearly impossible to dry out. They quickly turn into a perfect, hidden breeding ground for mold.
Trying to salvage these items is a gamble with your home's air quality and your family's health. It’s a gamble you’ll almost always lose.
If these items have been soaked through, it is safest to get rid of them:
- Mattresses and Box Springs: You can't dry out the inside of a mattress. It becomes a hidden mold factory you'll be breathing in all night long.
- Upholstered Furniture: That deep foam padding in your couch or armchair will trap moisture and contaminants for months.
- Carpet and Padding: The carpet might feel dry on top, but the padding underneath acts like a sponge, staying damp for weeks and feeding mold growth.
- Particleboard Furniture: Made of wood chips and glue, this type of furniture swells, crumbles, and falls apart when wet. It will never be the same.
- Books, Photos, and Paper: While a restoration professional can sometimes save priceless documents, most saturated paper goods will harbor mold between the pages.
Making these decisions is hard. It feels wasteful, but removing these high-risk items is one of the most critical steps you can take to ensure your home is truly safe and mold-free after a water disaster.
Deep Cleaning To Ensure Mold Has Nowhere To Hide
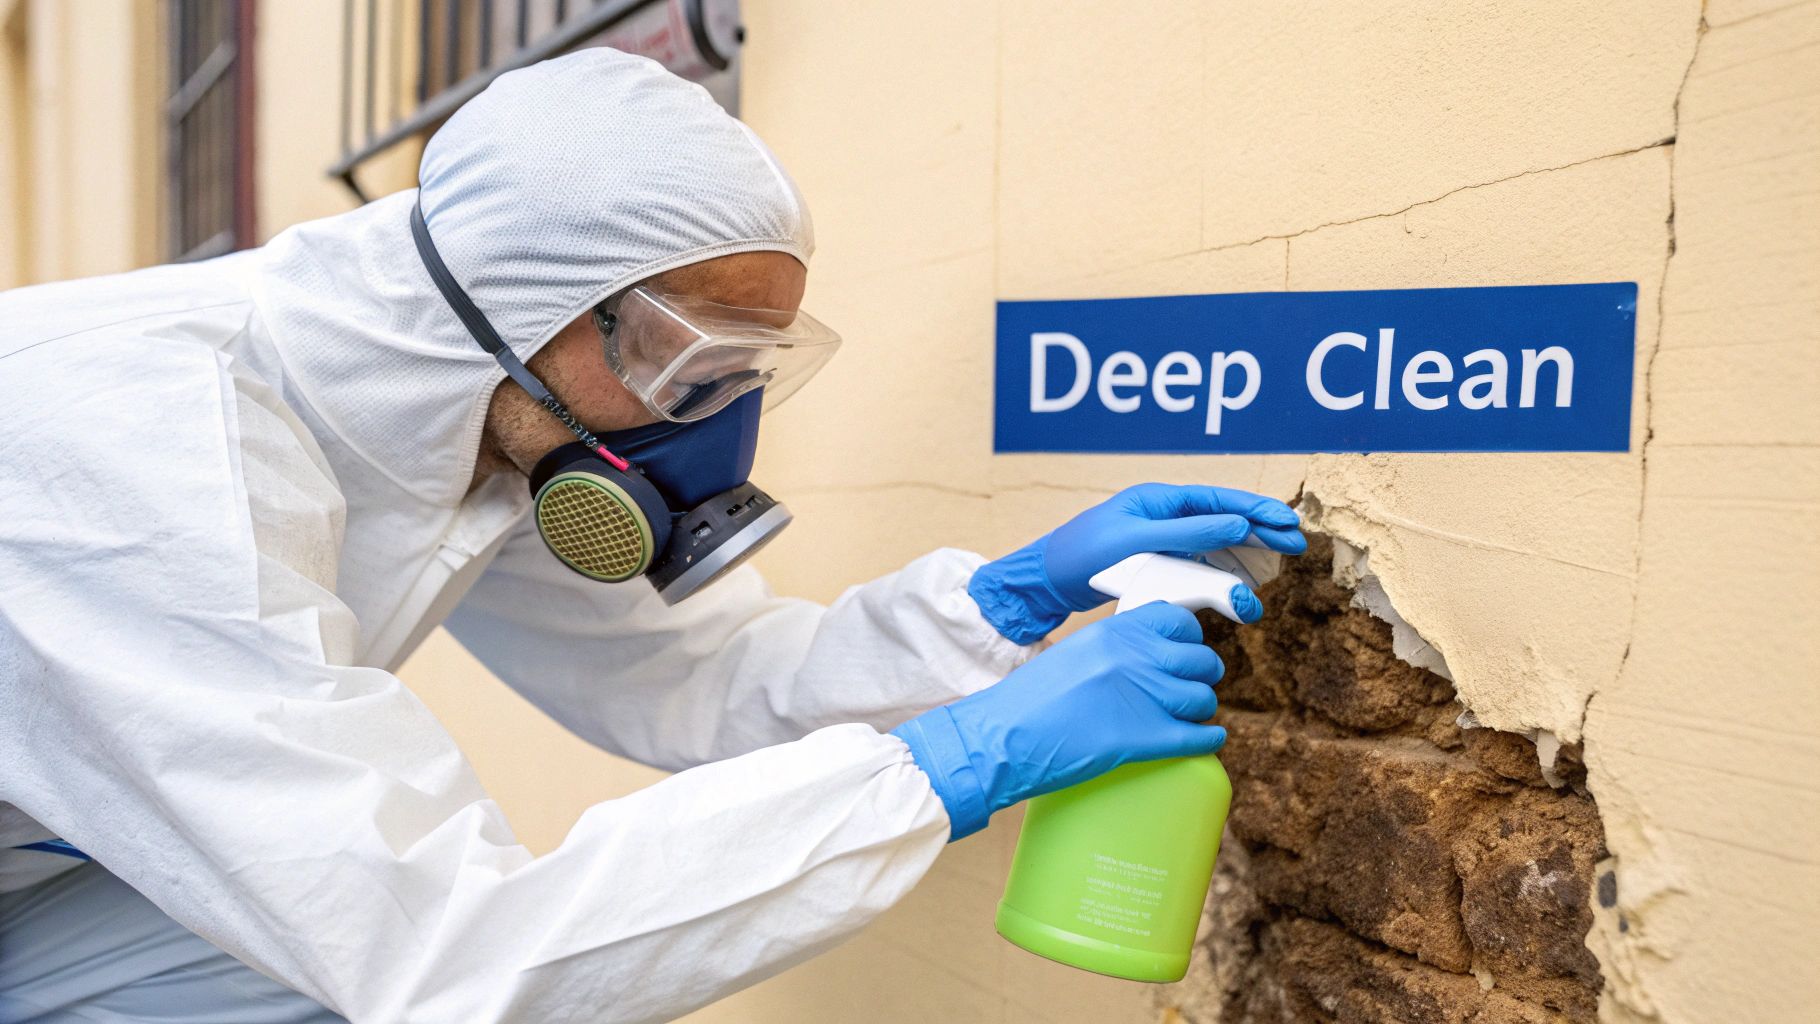
Once the fans and dehumidifiers have gone silent and everything feels dry, you’ve reached a critical stage. This isn't just a weekend cleanup. It's a methodical, top-to-bottom deep clean designed to get rid of any microscopic mold spores that survived the initial drying process.
Think of this as your final, and most important, line of defense in preventing mold after water damage.
A lot of people automatically reach for bleach, thinking it's the silver bullet for killing mold. I've seen it time and time again, and it's a common and potentially dangerous myth. While bleach is fine for hard, non-porous surfaces like a bathtub or tile, it’s next to useless on porous materials like drywall or wood. The chlorine often just sits on the surface, while the water in the bleach soaks in—potentially feeding the very mold you're trying to eliminate.
The real goal here is physical removal, using the right tools and cleaning agents, not just dousing everything in harsh chemicals.
The Right Tools And Safety Gear For The Job
Before you even think about scrubbing, gearing up with the right Personal Protective Equipment (PPE) is non-negotiable. You’re dealing with airborne spores you can't see, and they can cause some serious respiratory issues and allergic reactions.
Here’s your essential safety checklist:
- An N95 Respirator: This is the absolute minimum. A simple dust mask just won't cut it when it comes to filtering out tiny mold spores.
- Safety Goggles: Keep your eyes protected from splashes, cleaning agents, and any airborne debris.
- Gloves: Long, disposable gloves are best to protect your skin from both the cleaners and any contaminants.
Taking these precautions is about protecting your health while you work to make your home safe again.
Choosing The Right Cleaner For The Job
The cleaning solution you use should depend entirely on the surface you're treating. There’s no "one-size-fits-all" answer, and using the wrong product can be ineffective or even cause more damage.
Often, a simple solution of non-phosphate detergent and water is all you need to physically wipe spores off a surface. For a more serious sanitization effort, look for EPA-approved antimicrobial cleaners specifically designed for mold.
To make it easier, here's a quick guide I put together to help homeowners pick the right product.
Choosing The Right Cleaner For The Job
| Cleaning Agent | Best For (Surface Type) | Pros | Cons & Safety Warnings |
|---|---|---|---|
| Detergent & Water | Hard surfaces, pre-cleaning porous surfaces | Inexpensive, safe, and fantastic for physically removing spores. | It only removes spores; it doesn't kill them. |
| Antimicrobial Cleaner | Hard and semi-porous surfaces (wood, drywall) | Kills mold spores and helps prevent them from coming back. | Can be pricier; always follow the label directions to the letter. |
| White Vinegar (5% solution) | Hard, non-porous surfaces | A natural option that's mildly acidic and can kill some mold species. | Has a strong smell and isn't as potent as commercial products. |
| Bleach (diluted) | ONLY for non-porous surfaces like tile or glass | A powerful disinfectant, but only for hard, non-absorbent materials. | Useless on wood/drywall; creates toxic fumes. NEVER mix with ammonia. |
A Critical Reminder: The goal is always removal, not just killing. Dead mold spores can still trigger allergies and health issues. After treating an area with any cleaning agent, wipe it down thoroughly with a clean, damp cloth and then dry it completely.
This strategic approach to cleaning makes sure every nook and cranny is addressed, leaving no food source or lingering spores behind. It’s the final step in taking back your home from water damage, and your thoroughness here will pay off with peace of mind for years to come.
Knowing When The Pros Should Take Over
It's one thing to tackle a small leak, but it's another thing entirely to know when you're in over your head. Knowing the difference is probably the most critical part of preventing a small water issue from turning into a massive mold problem. Pushing your DIY limits can backfire, leading to hidden mold, incomplete cleanup, and problems that are far more expensive and stressful to fix down the line.
One of the clearest dividing lines is simply the size of the affected area. A little puddle under the sink that’s contained to a few square feet? You can probably handle that. But if you’re looking at water damage that spreads over 10 square feet—think a 3×3 foot patch of soggy drywall—the game changes. At that point, properly drying everything out and controlling airborne spores without professional gear becomes a serious, often impossible, challenge.
Red Flags That Demand A Professional Eye
Some situations are just non-negotiable. If you run into any of these, don't hesitate—pick up the phone and call a certified professional.
-
Contaminated Water is Involved: If the water came from a sewage backup, an overflowing toilet, or overland flooding, you’re dealing with what the industry calls "blackwater." This stuff is a hazardous cocktail of bacteria and pathogens. It requires specific safety protocols and equipment for removal that you simply don't have in your garage.
-
That Musty Odor Just Won't Quit: You’ve dried, wiped, and aired everything out, but that unmistakable damp, earthy smell is still hanging around. A lingering odor is a classic sign that moisture—and likely mold—is trapped somewhere you can't see it. It could be inside a wall, beneath the floorboards, or hiding in your HVAC system.
-
Someone in Your Home is High-Risk: If anyone in your family has asthma, severe allergies, or a compromised immune system, their health is the top priority. They are far more sensitive to mold. A DIY cleanup can kick millions of spores into the air, creating a dangerous environment for them. Pros use containment barriers and air scrubbers to keep the rest of your home safe during the process.
Choosing The Right Remediation Company
When it's time to call for backup, you want a certified remediation specialist, not just a general contractor. The mold remediation field is booming; some projections show the global market hitting around USD 1.52 billion by 2030, thanks to an increase in water damage events. You can read more about the growth of the mold remediation market here. That growth means a lot of new companies are popping up, so you have to know what to look for.
A true professional doesn't just scrub the mold you can see; they diagnose and fix the moisture problem that caused it in the first place. Without that, the mold is guaranteed to come back. That holistic approach is where the real value is.
Make sure any company you consider has technicians certified by the Institute of Inspection, Cleaning and Restoration Certification (IICRC). This is the gold standard in our industry. It means they've been trained on proven, science-backed methods for safe and effective mold removal. It's your assurance that they know how to get rid of the mold without accidentally spreading it to other parts of your house.
Here in Santa Barbara and Ventura County, having a local expert who knows our climate and common building issues can make all the difference. If you're on the fence about whether your situation is a DIY job or needs a pro, a professional mold inspection service will give you the clear, unbiased answers you need to protect your property and make the right call.
Common Questions About Mold After Water Damage
Once the immediate chaos of water damage is over, the questions start bubbling up. That feeling of uncertainty can be just as stressful as the initial flood, so let's get you some clear, direct answers to the most common concerns we hear from homeowners.
How Quickly Can Mold Really Start Growing?
This is the big one—the question that puts a fire under the whole cleanup process. In the right conditions (think moisture, a food source like drywall, and a little warmth), mold spores can spring to life and start colonizing in as little as 24 to 48 hours.
That’s not a maybe; it’s a high probability. By day three, a small, hidden patch of moisture behind a baseboard can erupt into a very real, visible problem. This tight timeline is exactly why your speed in the first 48 hours is the single most important factor in preventing a major mold headache.
Can I Just Use Bleach and Paint Over Mold Stains?
Please don't. This is hands-down one of the most common—and dangerous—mistakes we see. Slapping a coat of paint over a mold stain does nothing but hide the issue, giving you a false sense of security while the problem gets worse.
The mold colony is still very much alive under that fresh paint. It will keep feasting on the drywall or wood, weakening the structure and pumping spores into your home. You have to physically remove all of it and fix the moisture source for good before you even think about picking up a paintbrush.
Is It Safe to Live In My House During the Cleanup?
This really comes down to the scale of the damage. If it was a small spill that you cleaned and dried right away, you're likely fine. But if water has soaked into your walls, seeped under the floors, or saturated insulation, you need to be cautious.
Air quality can get dicey fast when mold spore counts are high, leading to allergic reactions and breathing problems. Plus, the remediation process itself often involves loud fans and potential chemical use.
It’s probably safer to find a temporary place to stay if you notice any of these signs:
- There’s a strong, musty smell that just won't go away.
- The affected area is larger than a small closet (roughly 10 square feet or more).
- Anyone in the house has asthma, allergies, or a compromised immune system.
Will My Homeowners Insurance Actually Cover Mold Removal?
This is a tricky one. The honest answer is: it depends entirely on your policy and what caused the water damage in the first place.
Typically, mold damage that stems from a "sudden and accidental" event—like a pipe that bursts unexpectedly—is often covered, at least up to a certain limit. But mold caused by slow, gradual leaks, poor maintenance (that faucet you meant to fix last month), or groundwater flooding is almost always excluded. Keep in mind that flooding requires its own separate insurance policy.
Your best move? Document everything with photos and videos from the very beginning. Then, call your insurance agent right away to get a clear picture of what your specific policy covers.
What Does a Mold Test Actually Tell Me?
After a water event, it’s natural to wonder if professional testing is worth it. A mold test gives you concrete data that goes beyond what you can see or smell. It identifies the specific types of mold you’re dealing with and, more importantly, measures the concentration of spores inside your home versus the normal levels outdoors.
For a deeper dive, our guide on understanding mold test results breaks down what a lab report really means for your home’s health. This data is invaluable for confirming a hidden problem, planning an effective remediation, and proving the job was done right.